User manual
This guide will give you an overview of how to use the Kafmasino ONE coffee machine application.
- Version: 1.1
- Author: Kafmasino
- Created: 12 April, 2022
- Update: 8 March, 2023
If you have any questions that are beyond the scope of this help file, Please feel free to email via Contact Page.
Devices compatibility
The Kafmasino app is compatible with most popular phones and tablets. To set up and use your Kafmasino products and services, you must install the Kafmasino app on a compatible device running one of the following operating systems:
- Apple iOS 11.0 or higher.
- Android 8.1 or higher.
Bluetooth 4.0+
Installation
Below are the download links for Apple and Android operating systems:


Landscape view
The landscape view of the application is the most comfortable to use on large smartphones and tablets. It allows you to view all the options of the application and to make the most of the graphs and data.
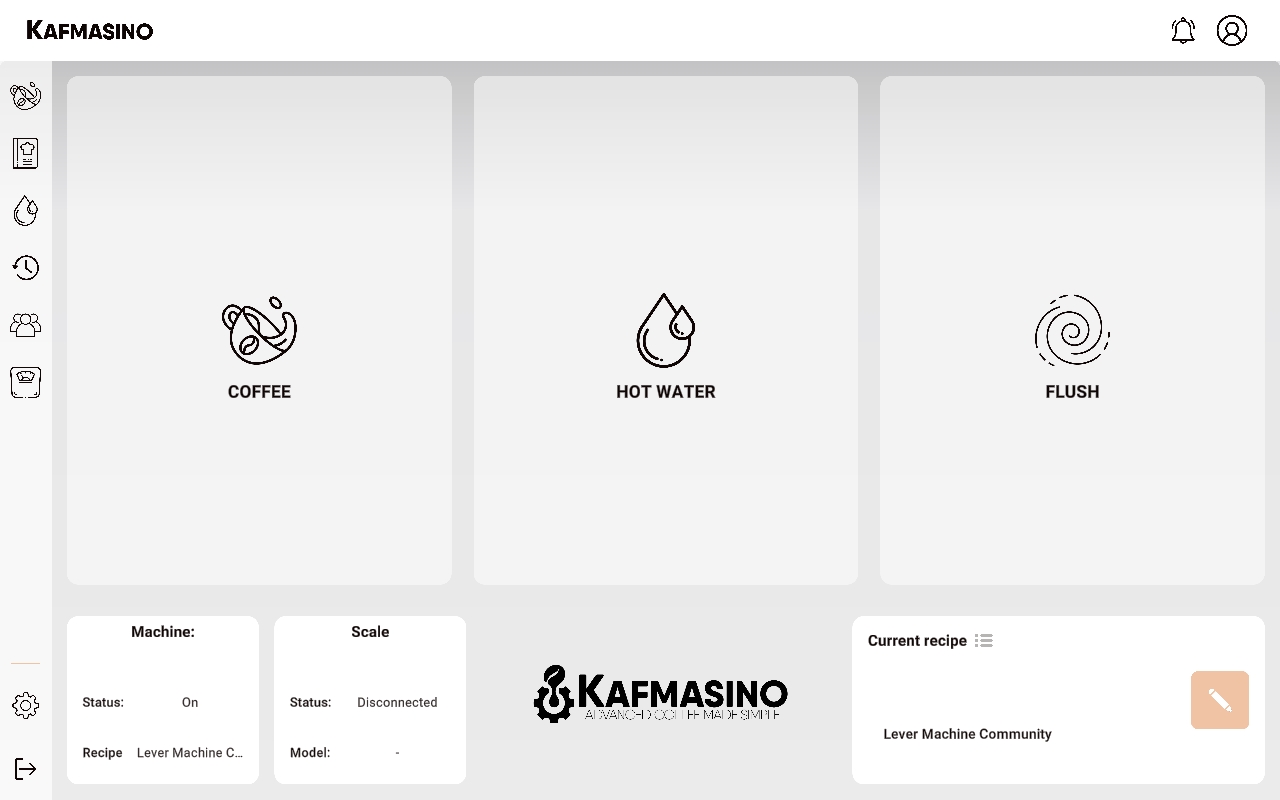
Coffee
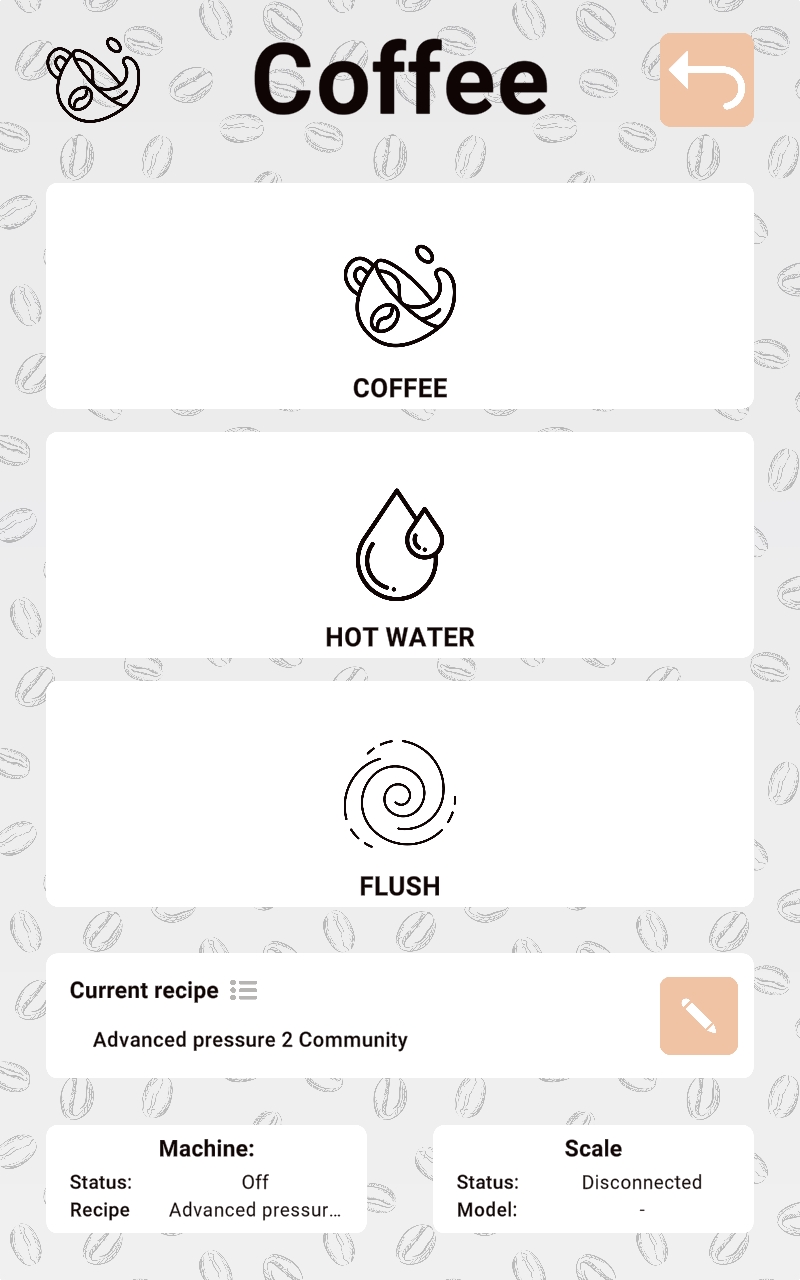
From the Coffee section you can control the infusion at all times, and you also have a series of interesting data that allow you to visualise at all times what is happening in the extraction.
Coffee view
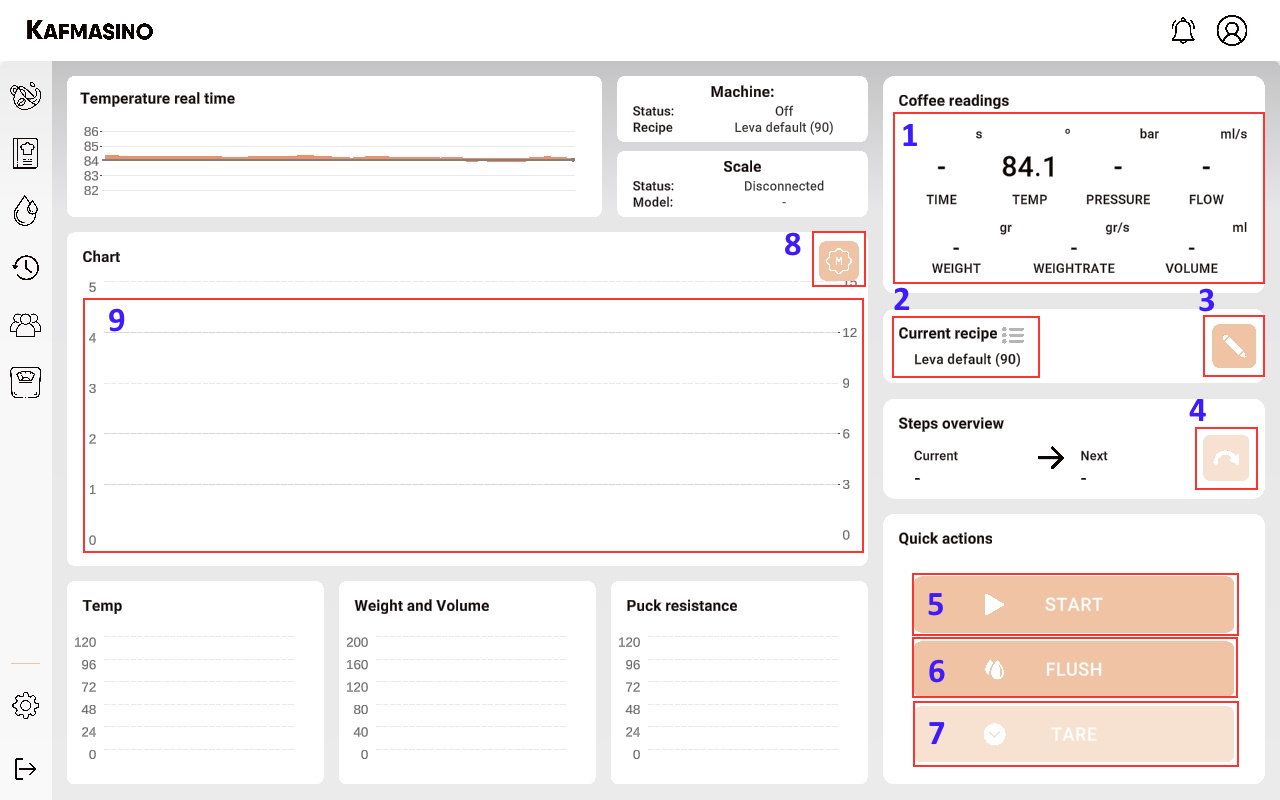
- By clicking on the "Coffee readings" section you can simplify the number of data displayed in real time.
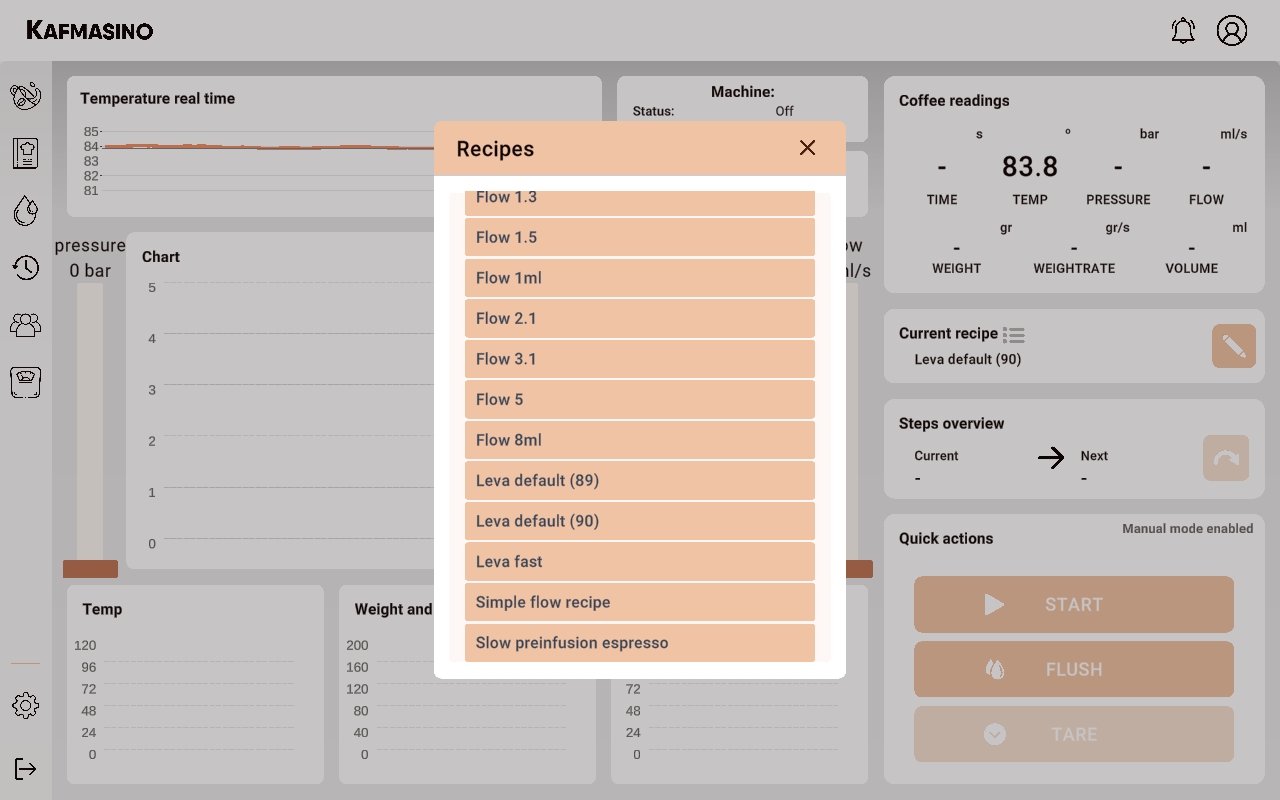
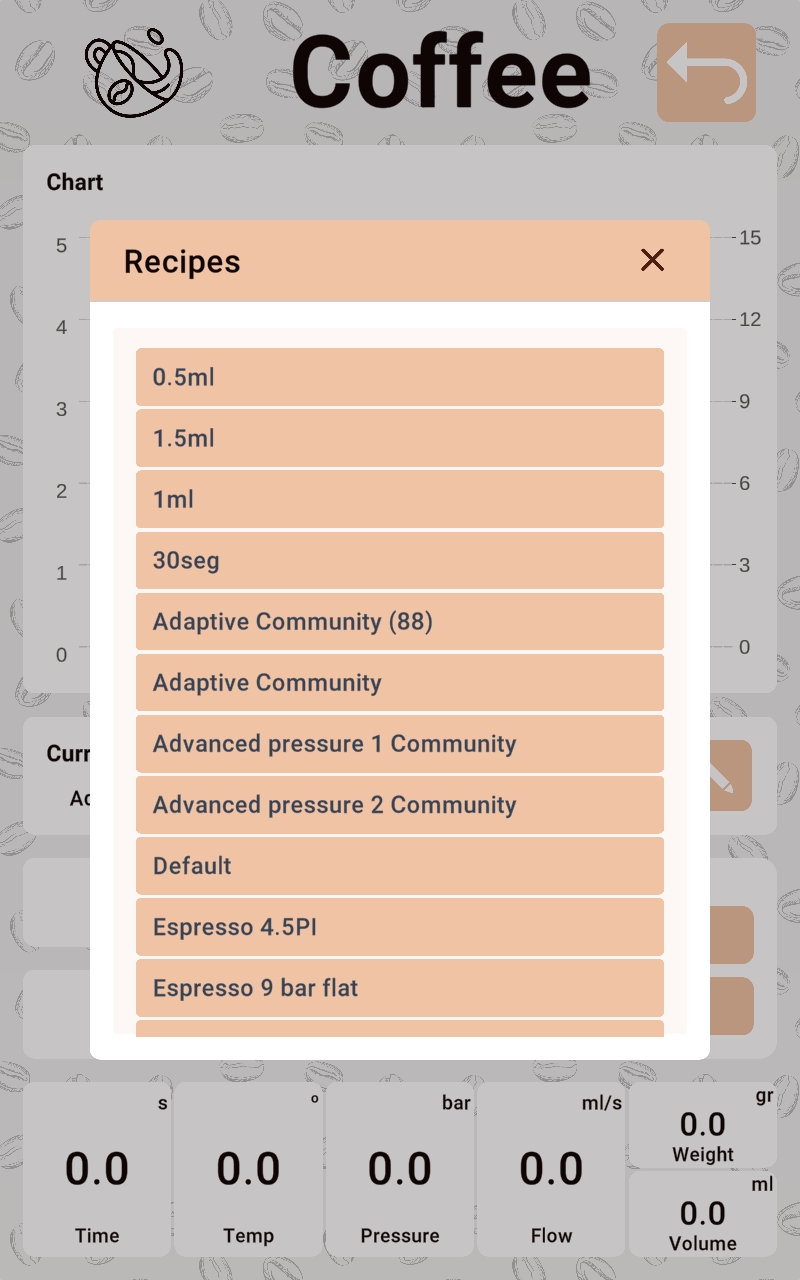
- Clicking on the current profile will display a quick selector of the stored profiles. This allows you to send directly without having to access the recipe screen.
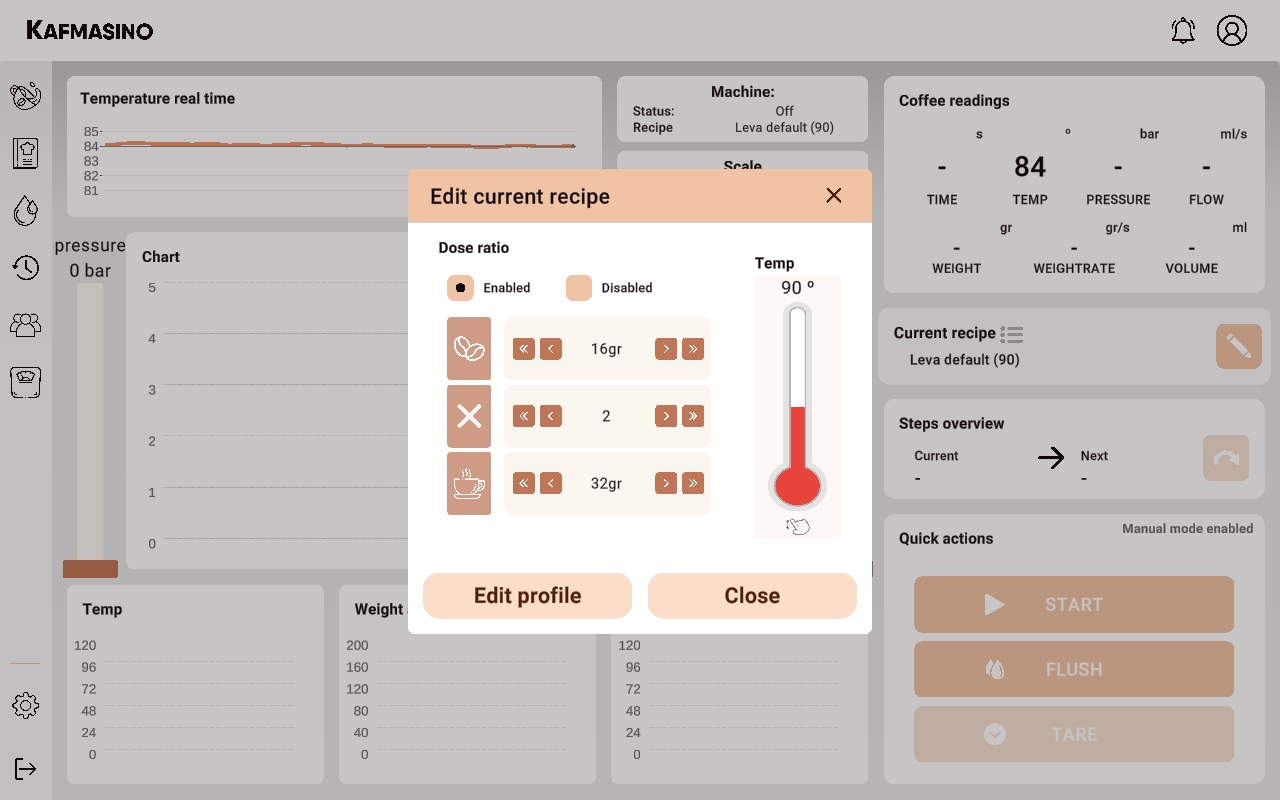
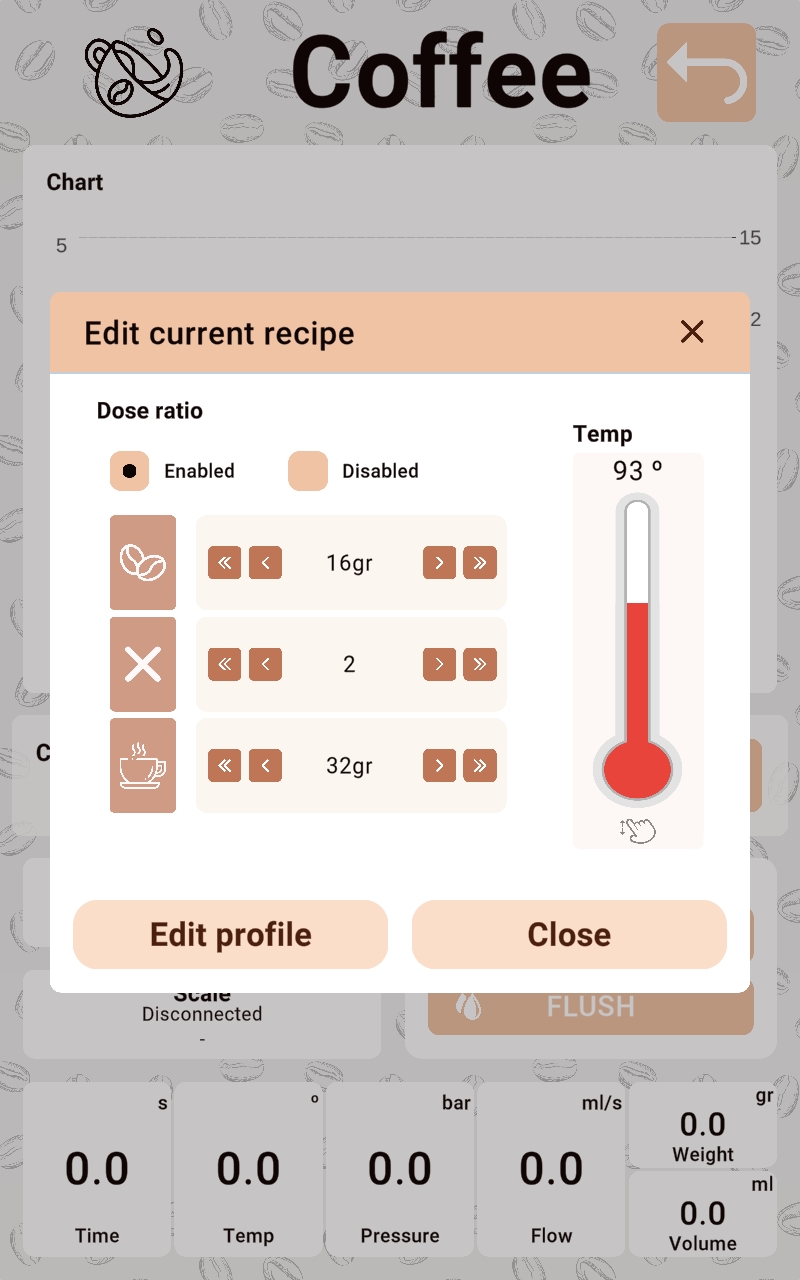
- By clicking on the edit icon, the temperature parameters and the cup weight setting can be modified. This option will only apply if the scale is switched on at the time of brewing.
- The curved arrow icon allows you to advance to the next step of the recipe when making coffee.
- Press to start infusion.
- Rinse the grouphead to clean.
- Scale tare. It is not necessary to run a tare before starting an infusion as it is automatically tared.
- By clicking on the icon, the operation of the infusion is modified. The manual mode allows the flow and pressure to be changed at any time.
- By repeatedly clicking on the graph, the size of the graph can be changed.
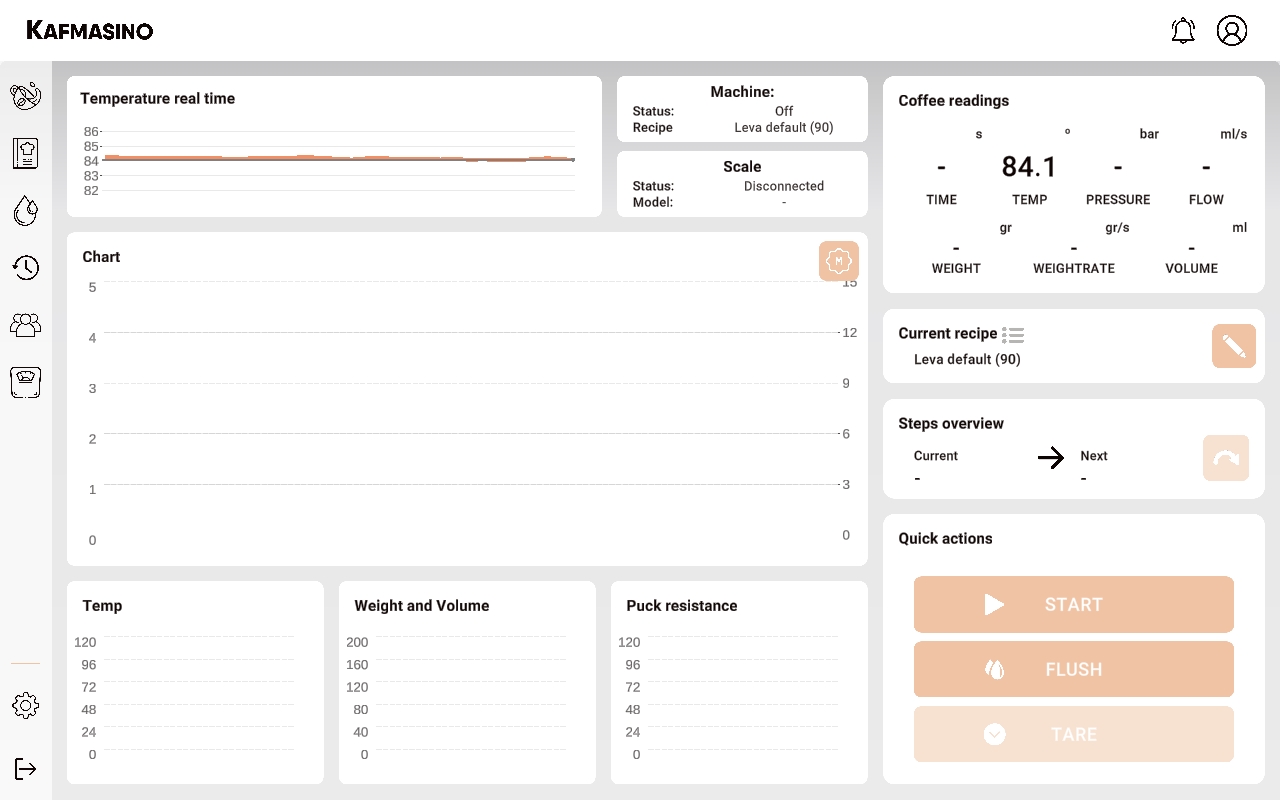

Simple mode
The application allows you to configure a simple mode that hides graphics and extra information.
Recipes
From this section you can modify the operation of the recipes. Basic recipes can be created based on pressure or flow. In addition, you can also create advanced recipes with which you can modify any combination of parameters and triggers.
Recipes view
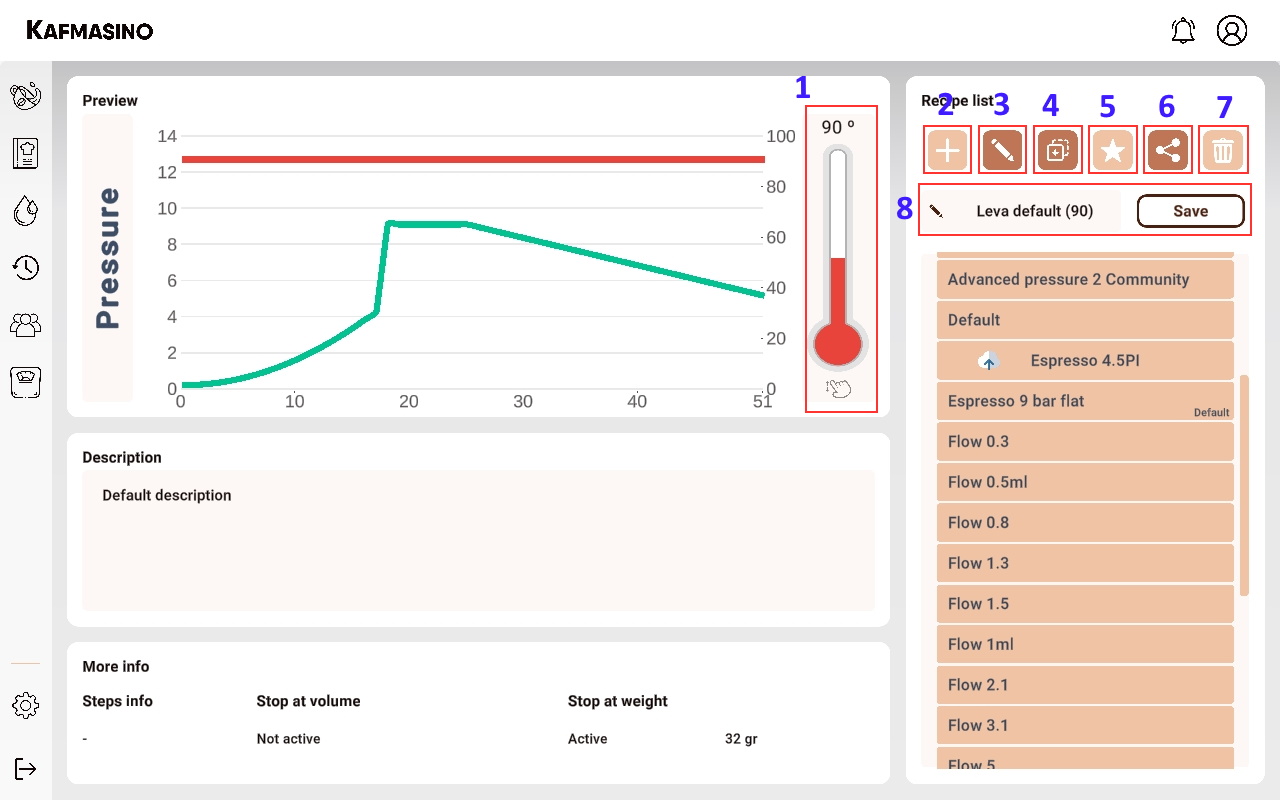
- By pressing the temperature thermometer, the temperature of a recipe can be raised or lowered in a simple way.
- Button to create a new recipe.
- Button to edit the selected recipe.
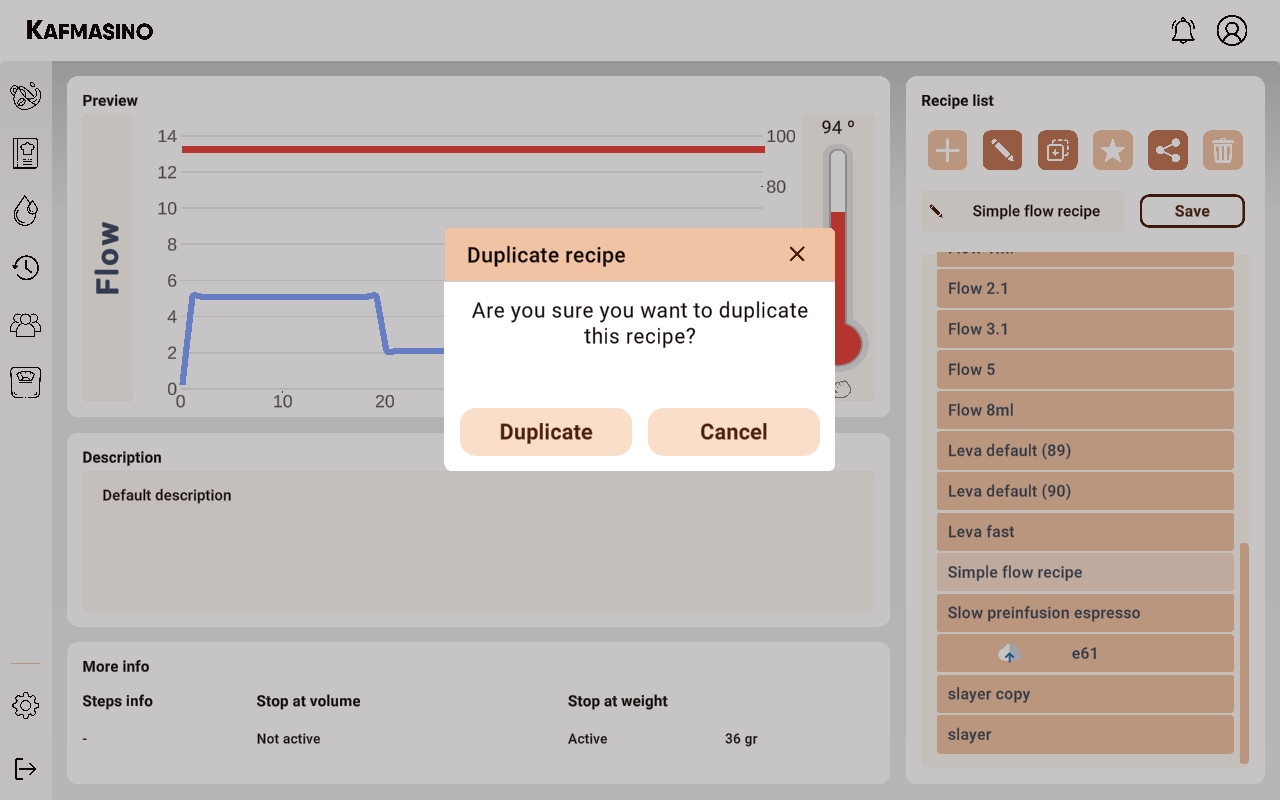
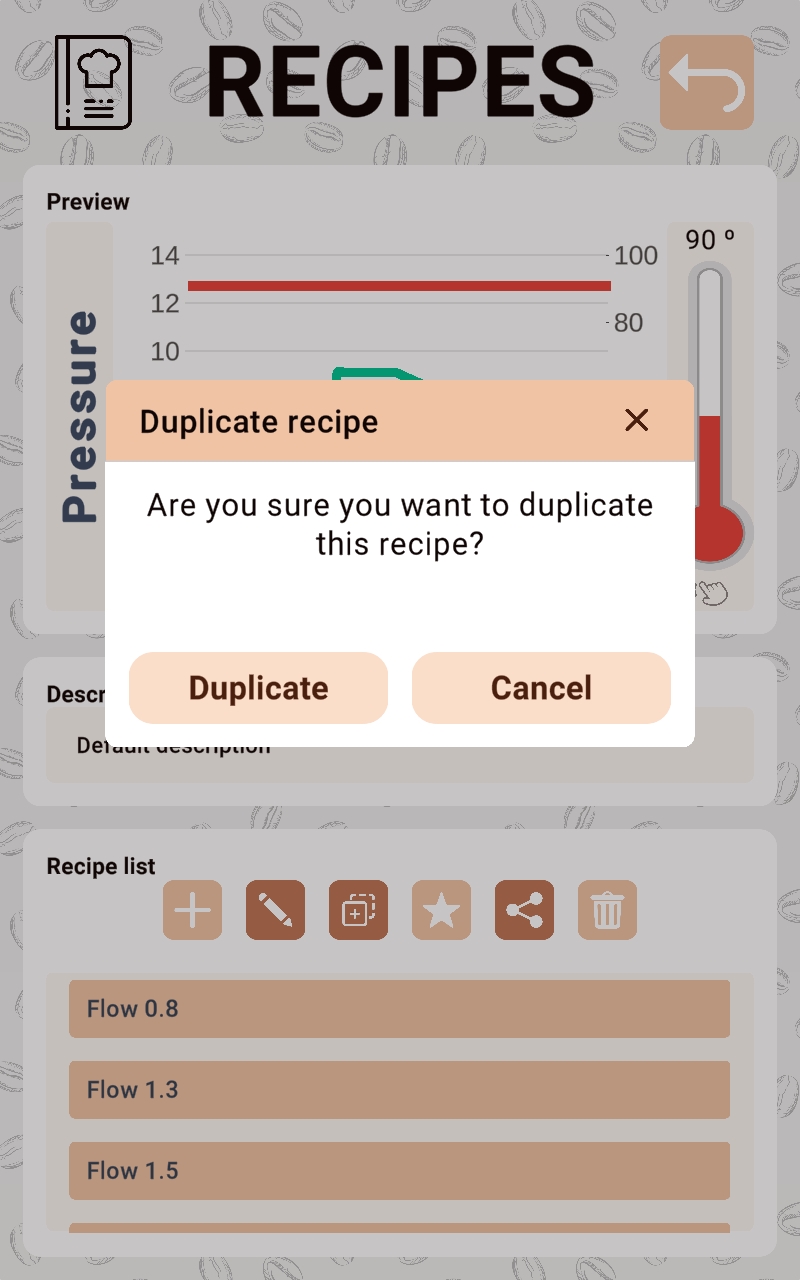
- Button to duplicate the selected recipe.
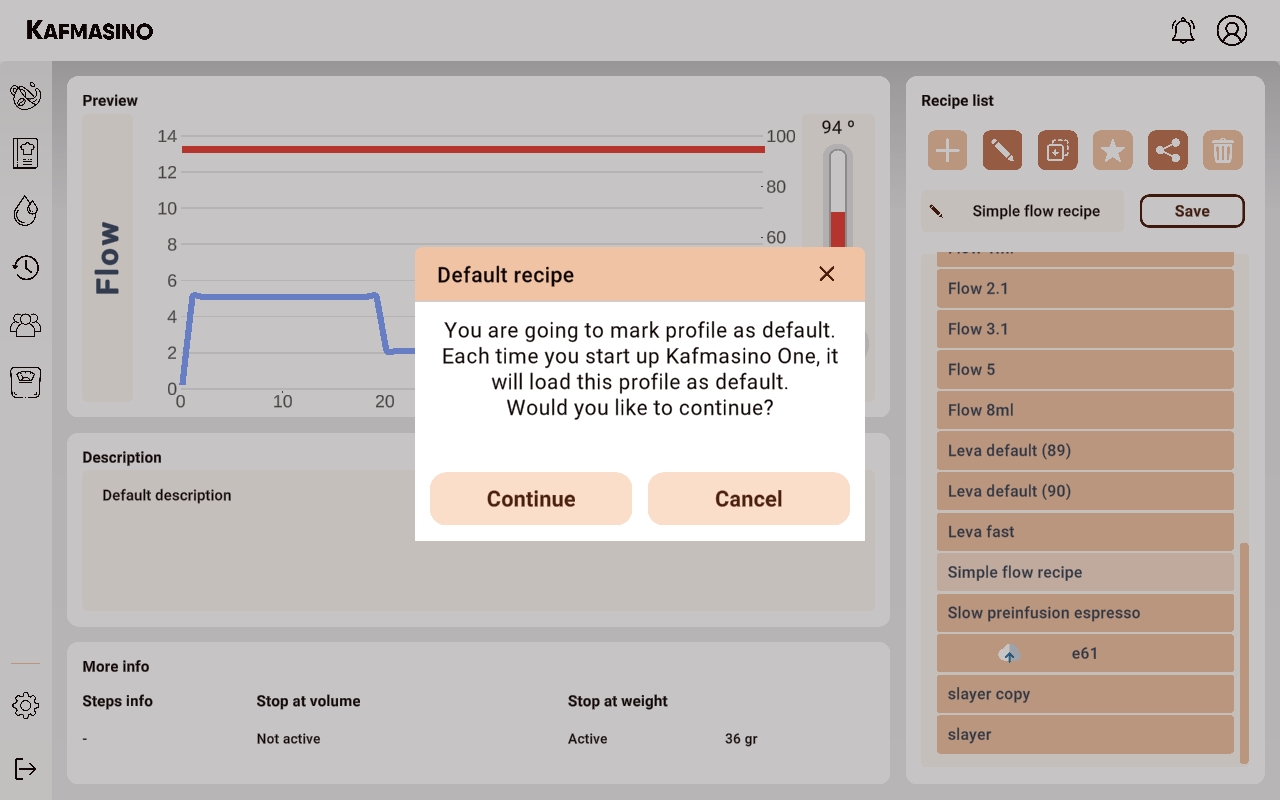
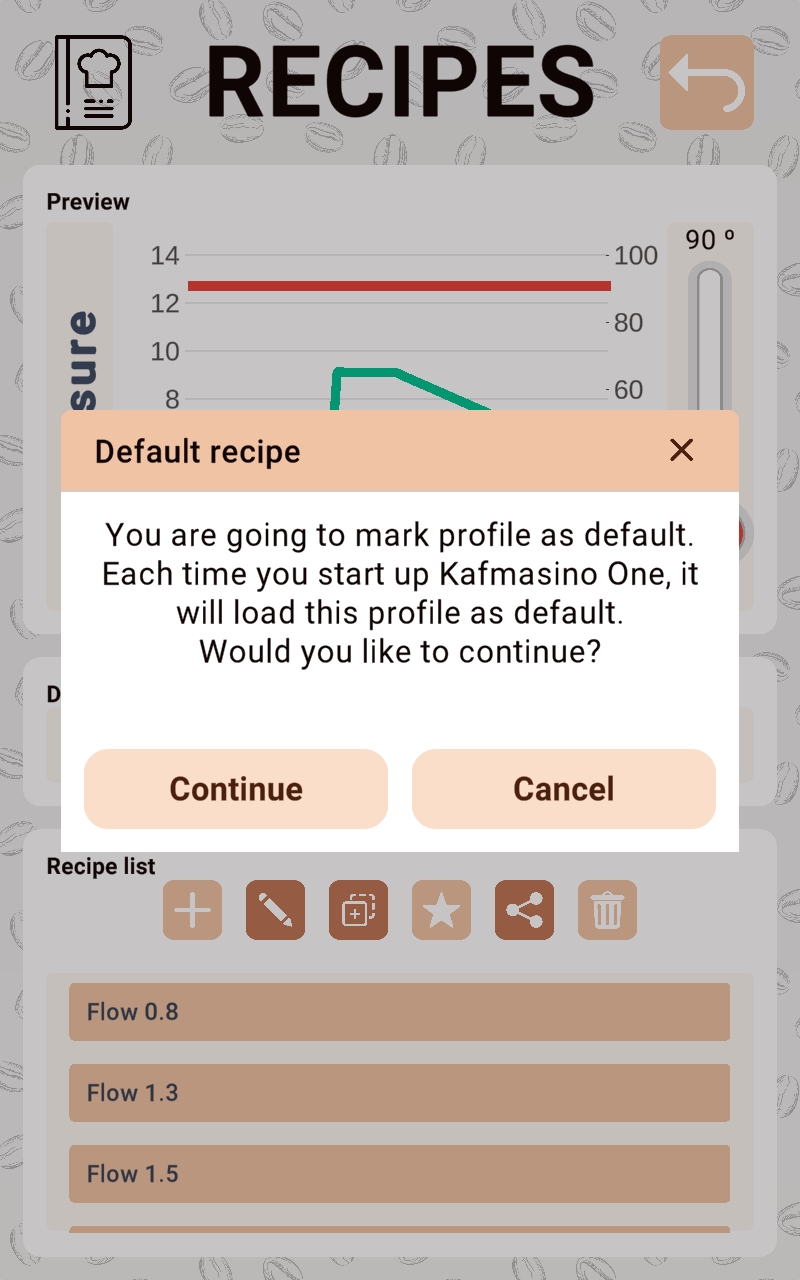
- Button to store the recipe in the internal storage of the machine.
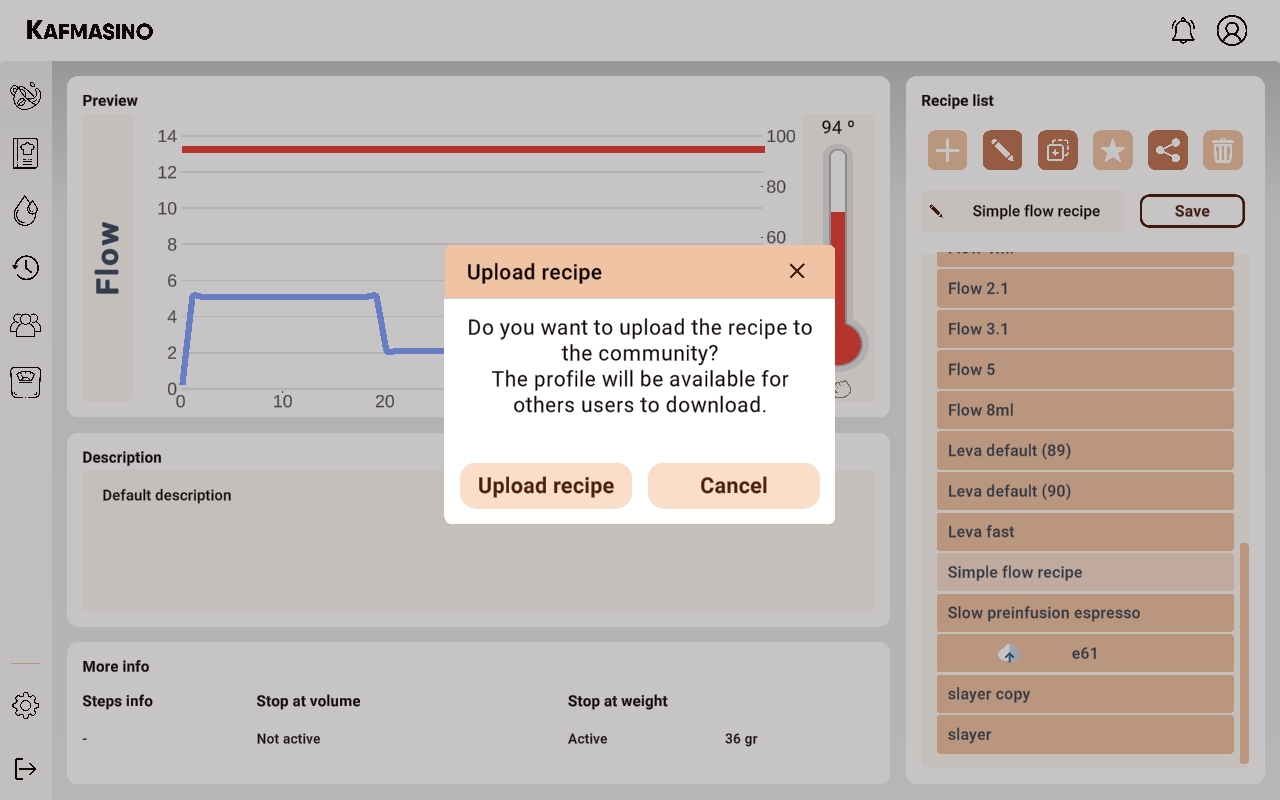
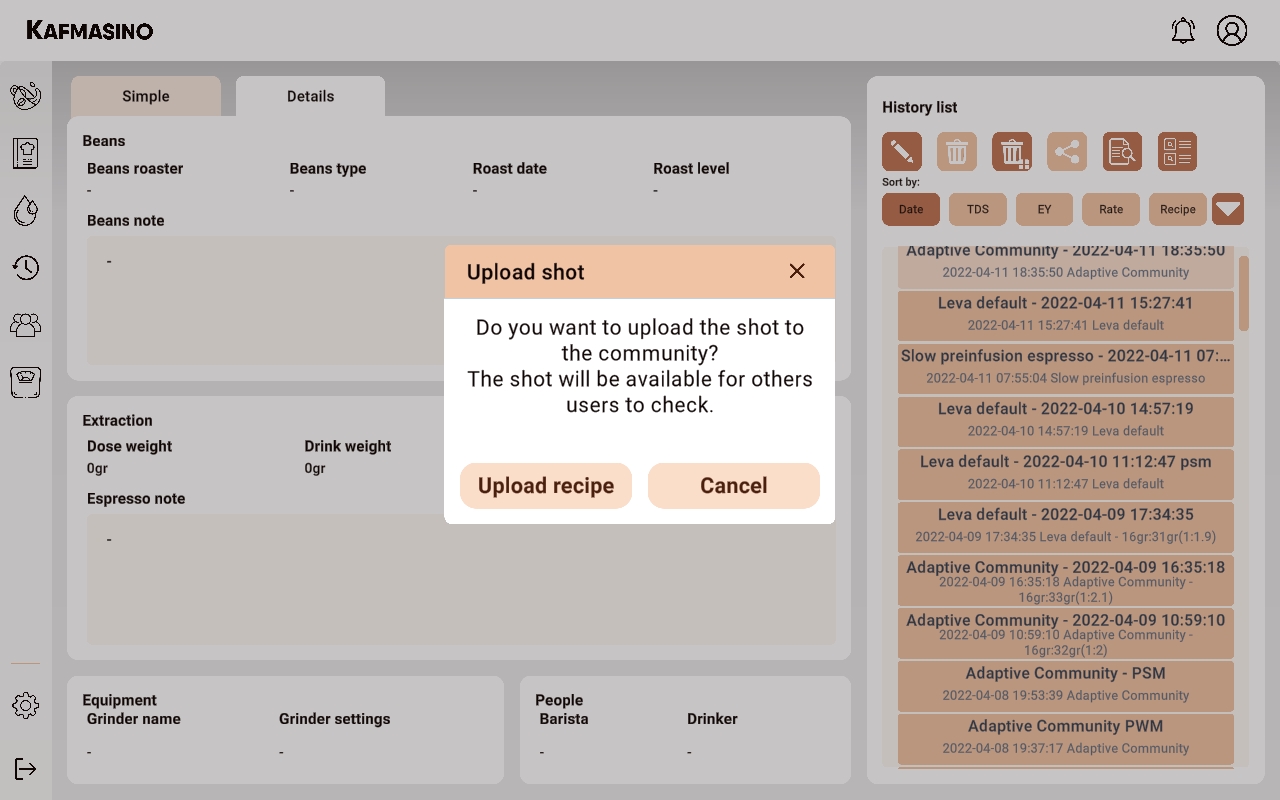
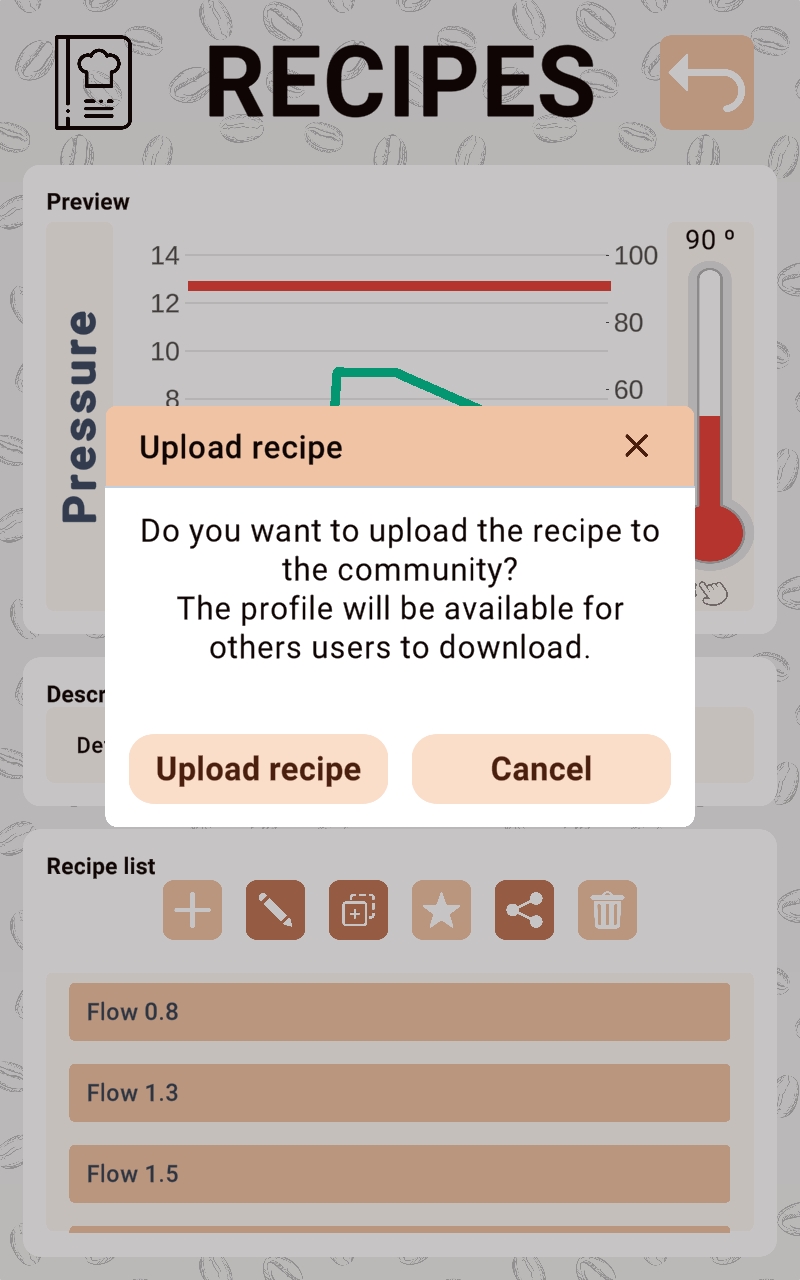
- Button to share the selected recipe with the community.
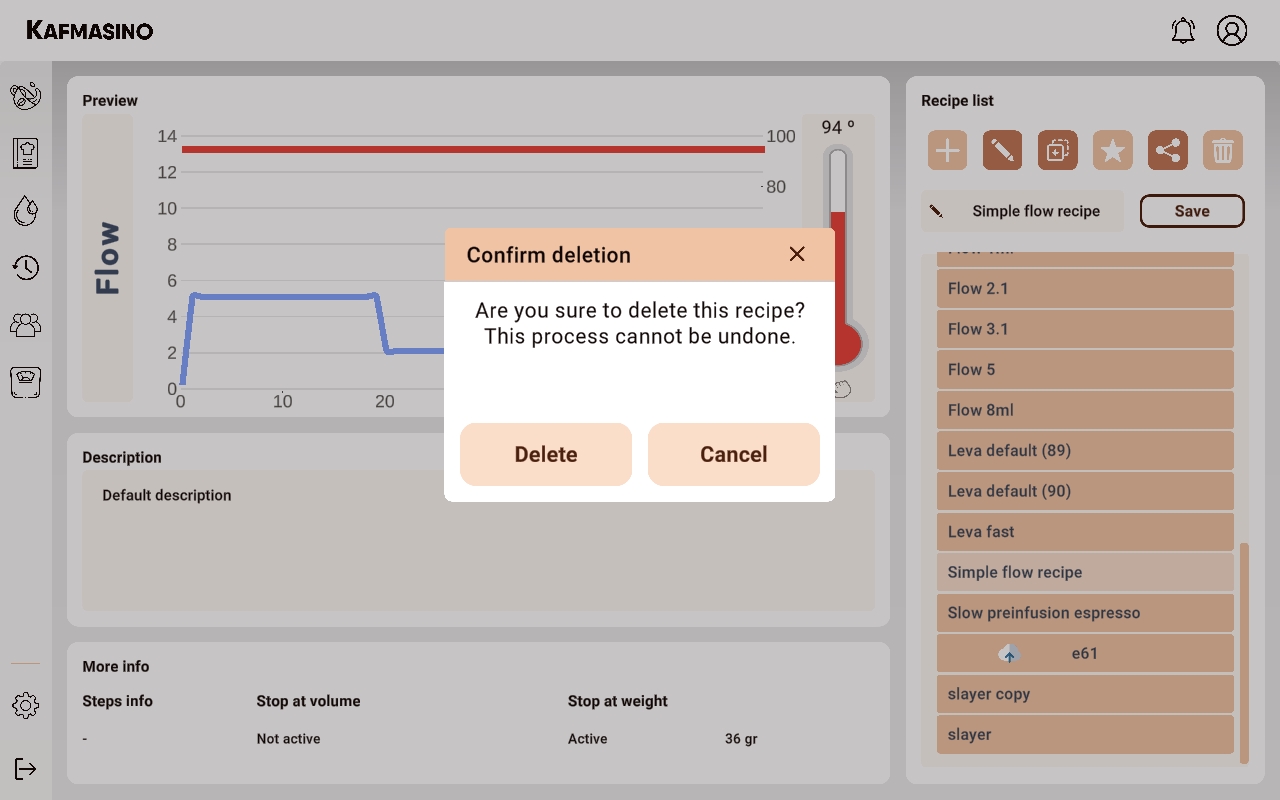
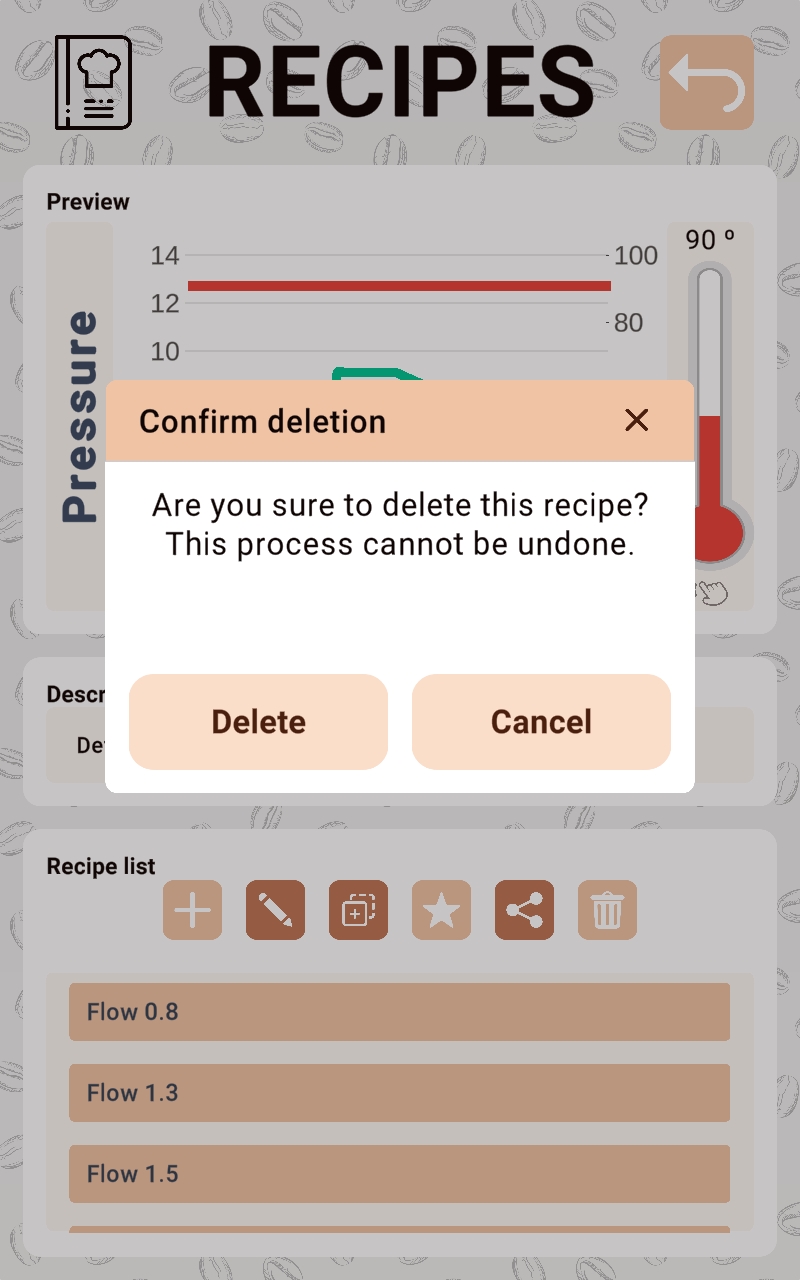
- Button to delete the selected recipe.
- By clicking on the edit icon you can rename the selected recipe.
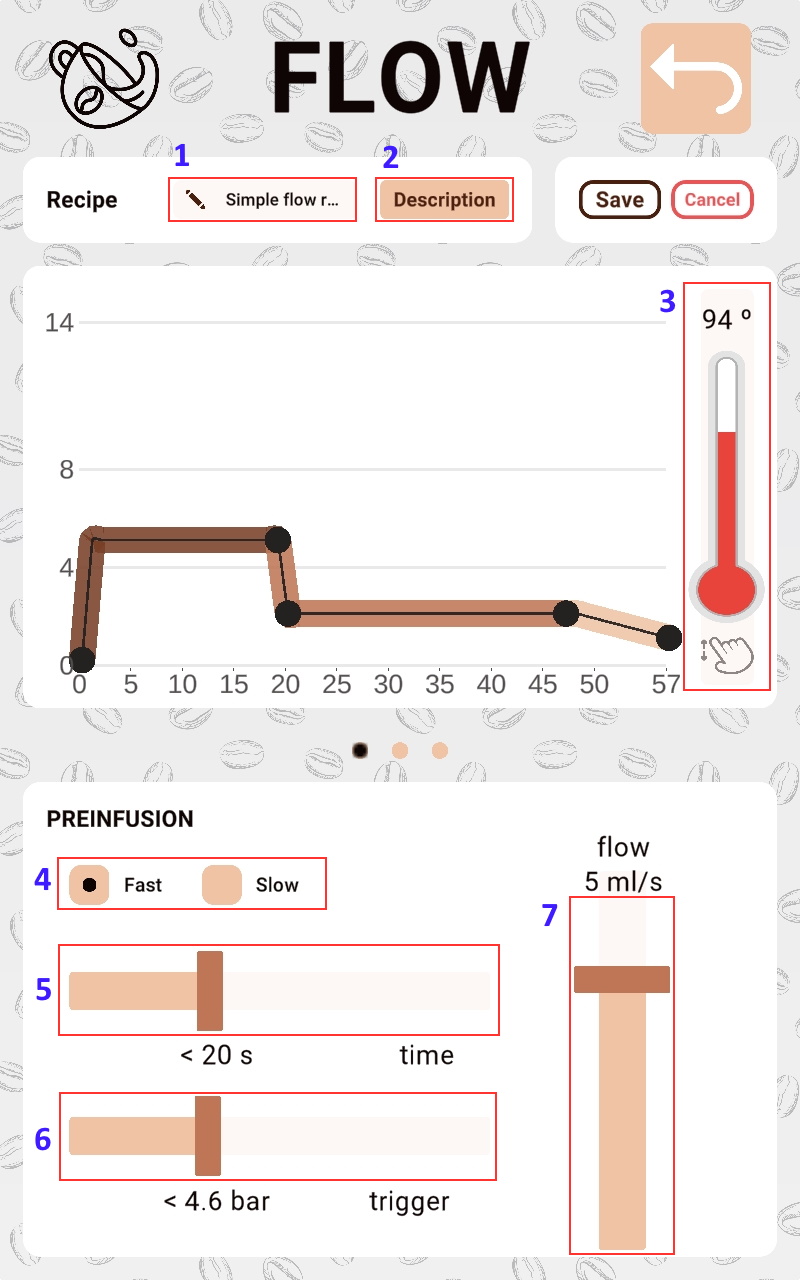
Flow recipes
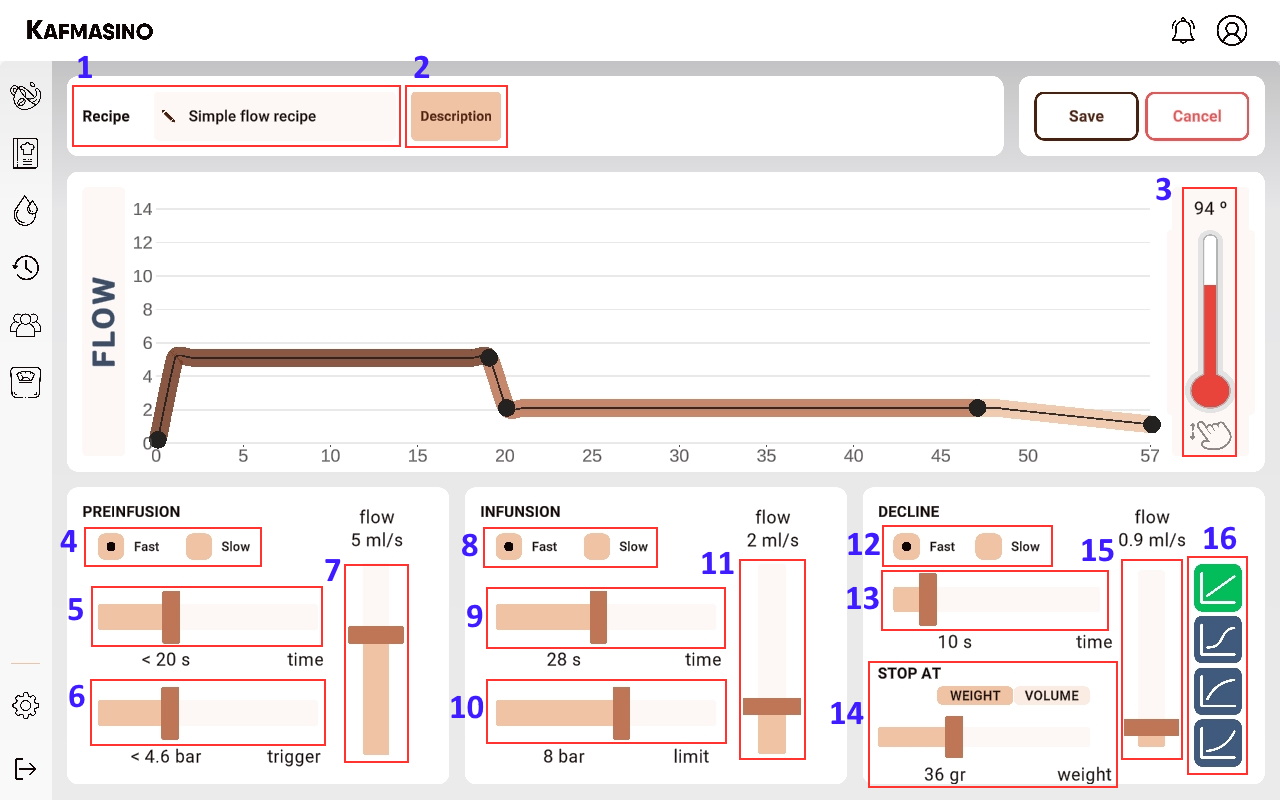
- Recipe name.
- Recipe description (optional).
- Recipe brew temperature.
- Preinfusion step mode. The fast mode allows to adjust in less time to the selected target value than the slow mode but it can be slightly exceeded.
- Maximum preinfusion step time
- Preinfusion step trigger. Exceeding the selected value will switch to the infusion step.
- Preinfusion flow target value.
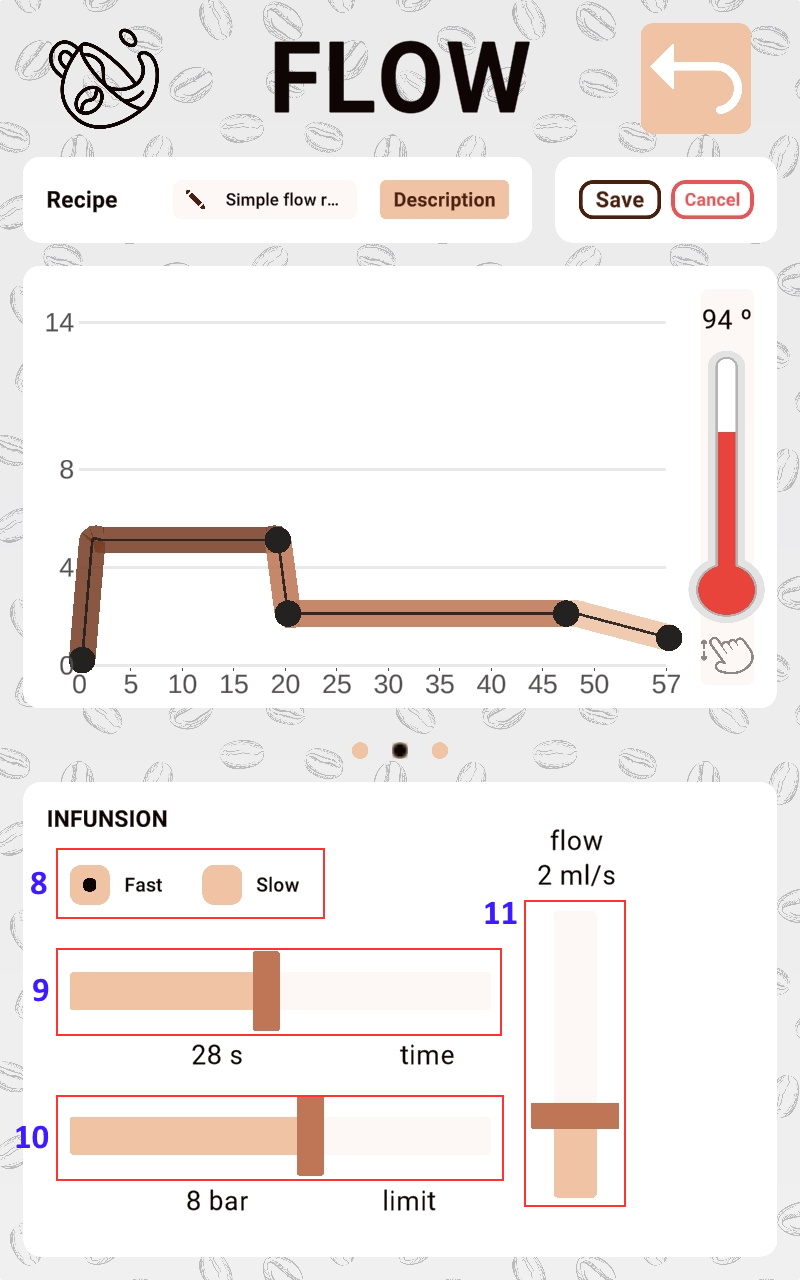
- Infusion step mode. The fast mode allows to adjust in less time to the selected target value than the slow mode but it can be slightly exceeded.
- Infusion step time
- Infusion step limit. Maximum allowable pressure value. If the pressure limit value is reached it is used as a limiting value so that the flow target value of the step will not be applied.
- Infusion flow target value.
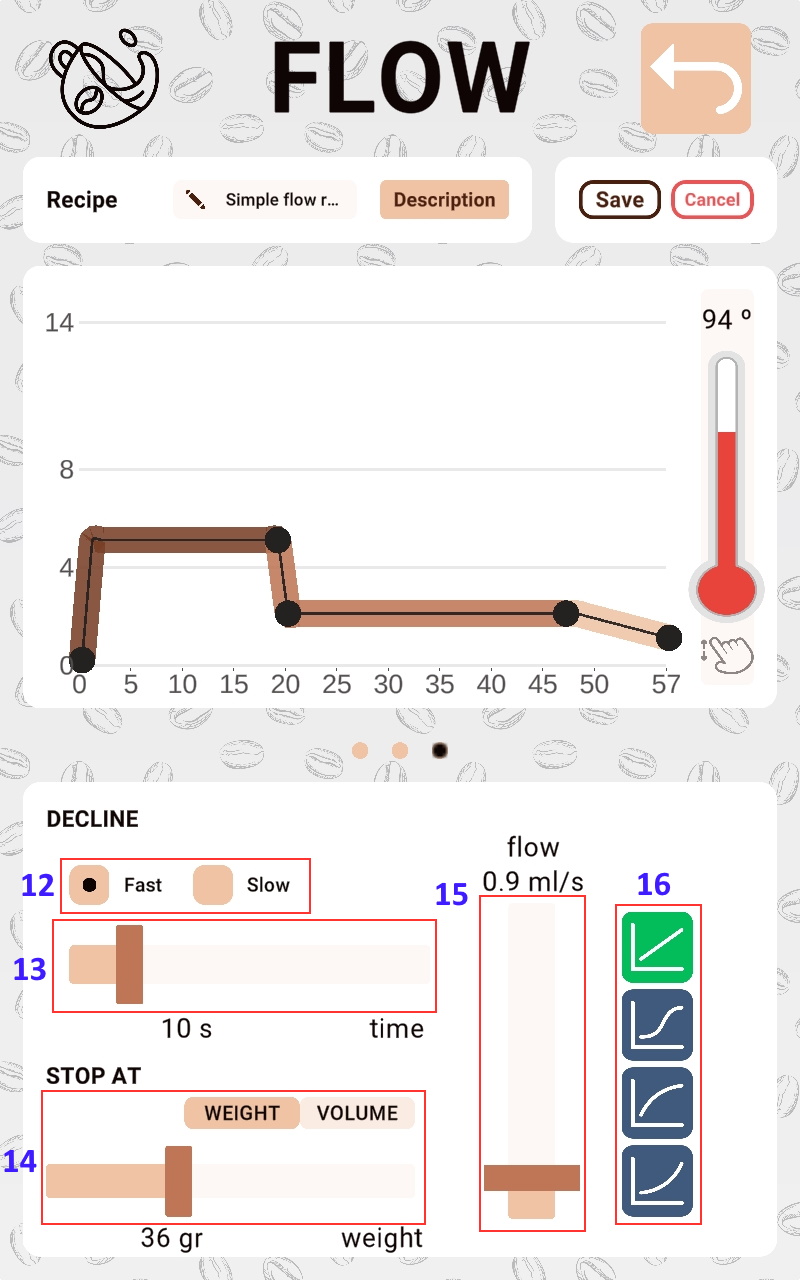
- Decline step mode. The fast mode allows to adjust in less time to the selected target value than the slow mode but it can be slightly exceeded.
- Decline step time
- The volume or weight value that allows the infusion to stop automatically. Weight stop is only available when the scale is connected to the application.
- Decline flow last target value.
- Function describing the target value of the decline step.
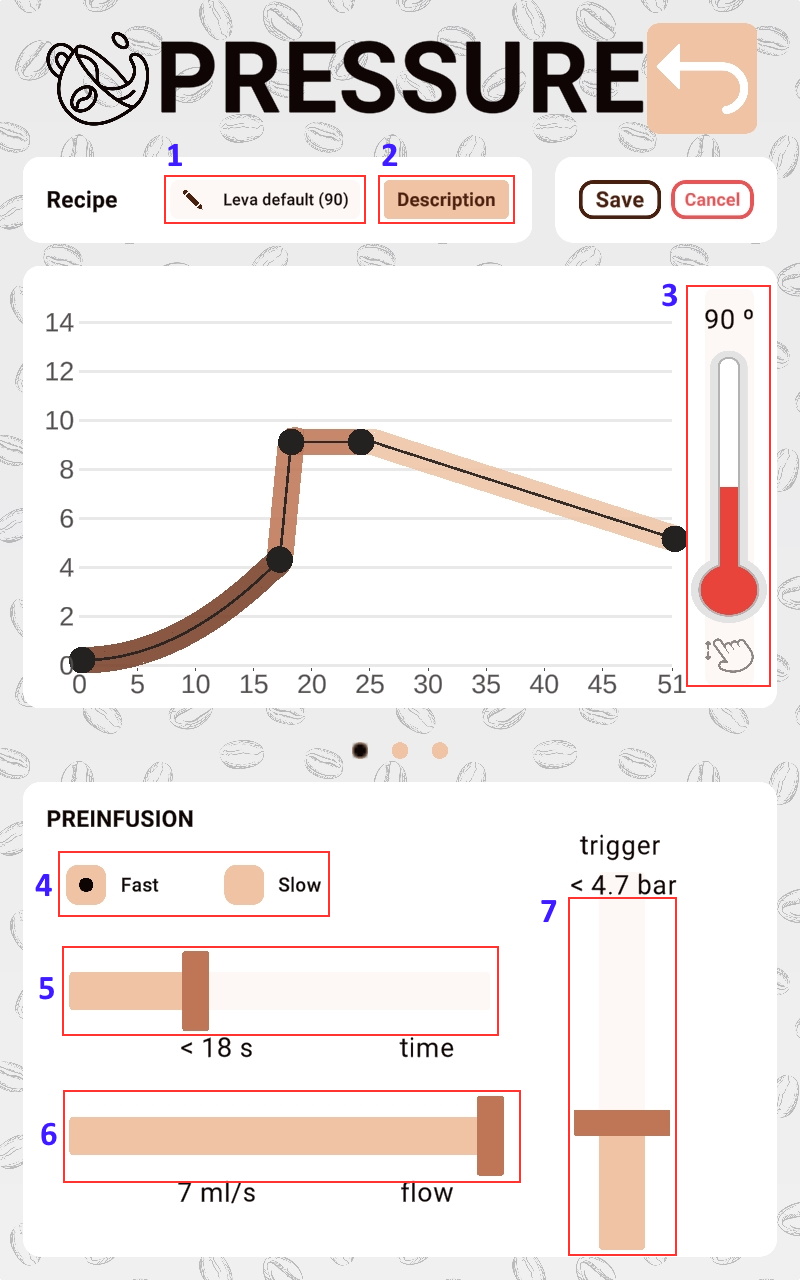
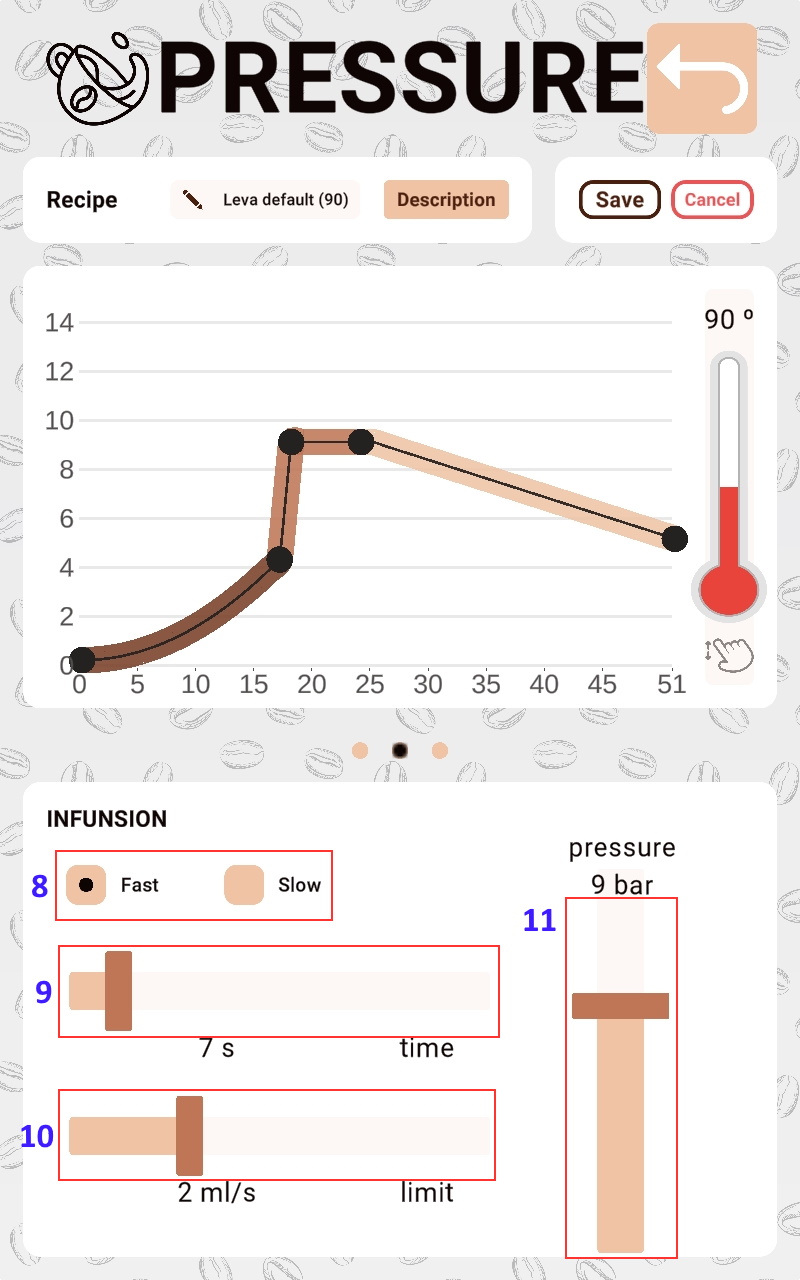
Pressure recipes
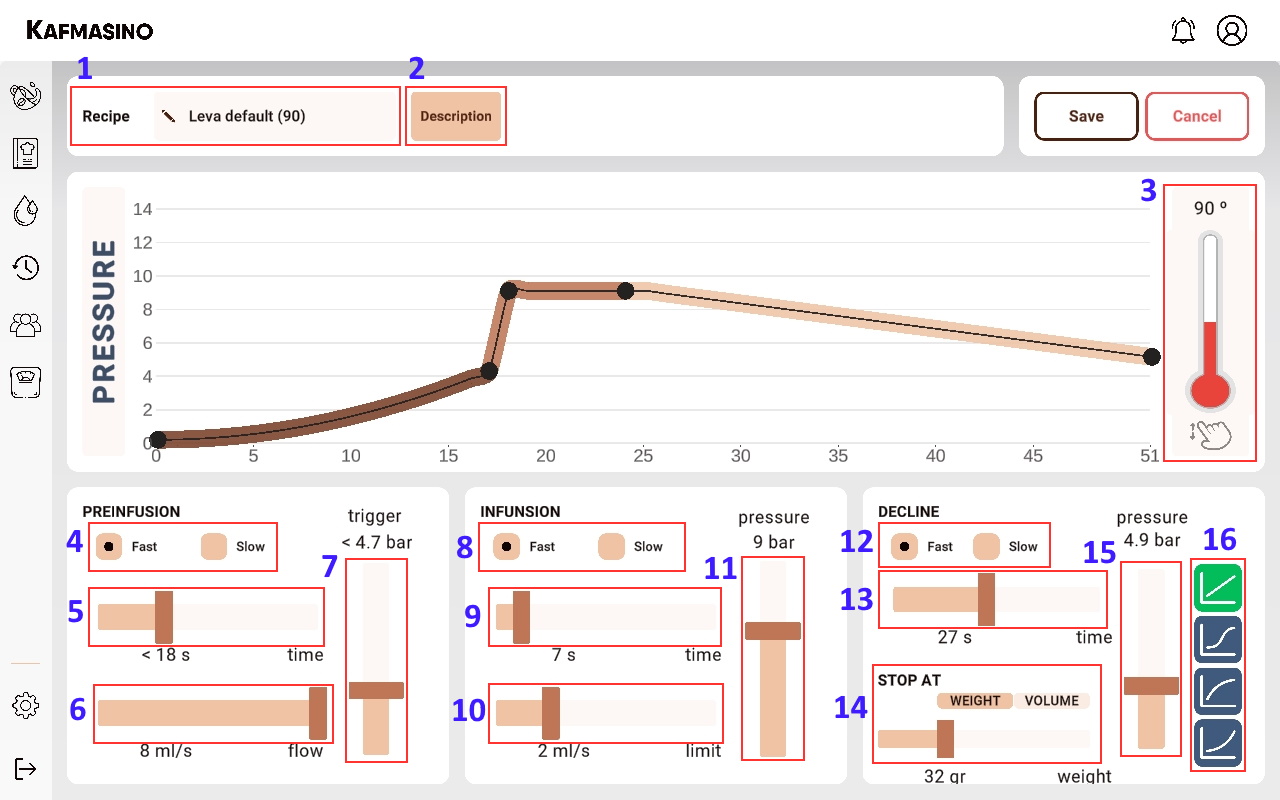
- Recipe name.
- Recipe description (optional).
- Recipe brew temperature.
- Preinfusion step mode. The fast mode allows to adjust in less time to the selected target value than the slow mode but it can be slightly exceeded.
- Maximum preinfusion step time
- Preinfusion flow target value.
- Preinfusion step trigger. Exceeding the selected value will switch to the infusion step.
- Infusion step mode. The fast mode allows to adjust in less time to the selected target value than the slow mode but it can be slightly exceeded.
- Infusion step time
- Infusion step limit. Maximum allowable flow value. If the flow limit value is reached it is used as a limiting value so that the pressure target value of the step will not be applied.
- Infusion pressure target value.
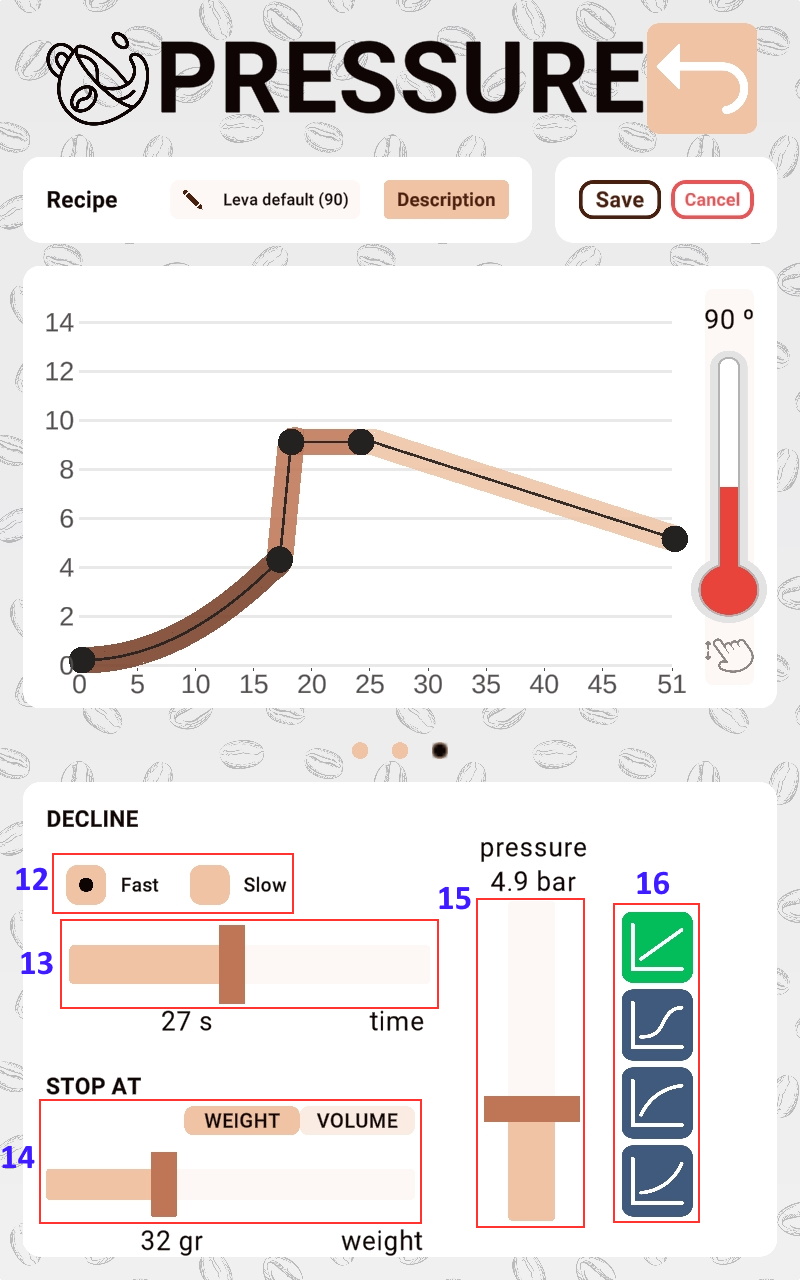
- Decline step mode. The fast mode allows to adjust in less time to the selected target value than the slow mode but it can be slightly exceeded.
- Decline step time
- The volume or weight value that allows the infusion to stop automatically. Weight stop is only available when the scale is connected to the application.
- Decline pressure last target value.
- Function describing the target value of the decline step.
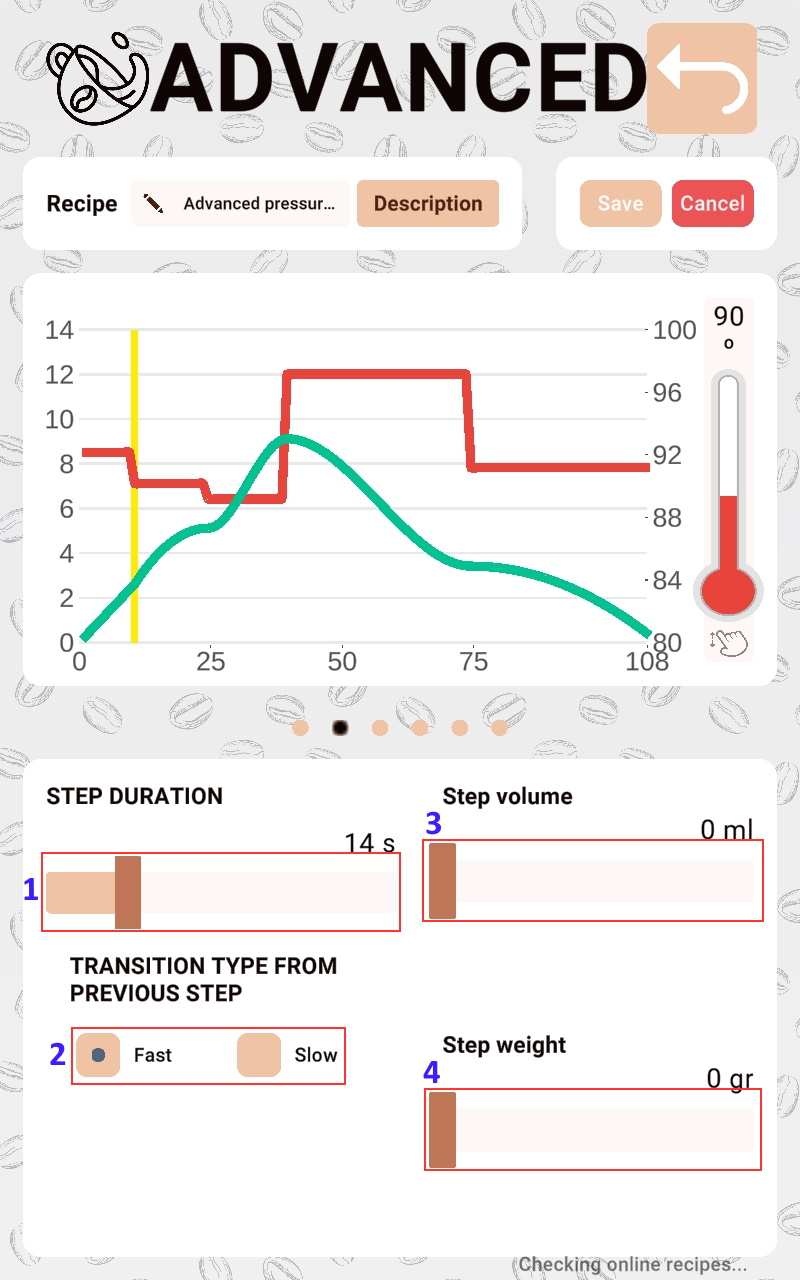
Advanced recipes
Advanced recipes allow you to create any combination of flow and pressure steps. The temperature of each step can be modified and triggers can be activated by pressure, flow and volume.
Duration
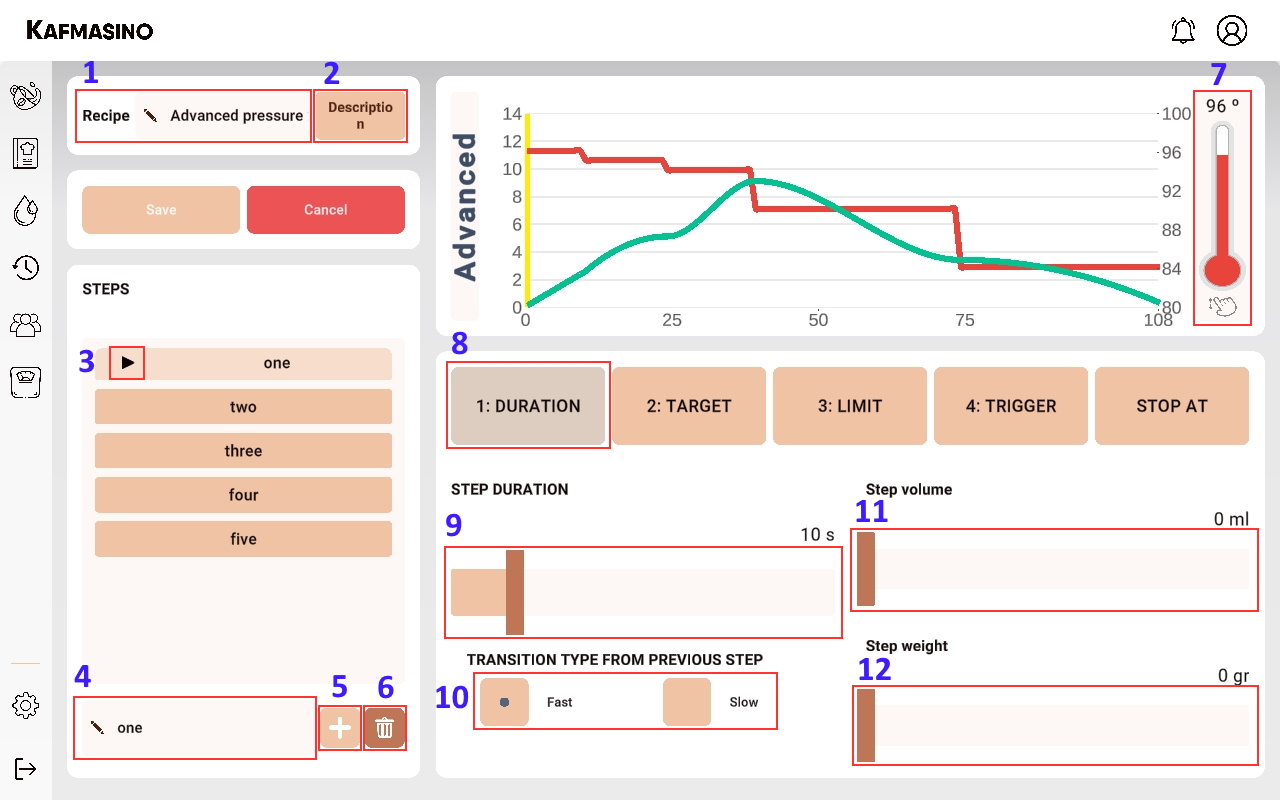
- Recipe name.
- Recipe description (optional).
- Indicates the step that is currently being modified.
- Step name.
- Add new step.
- Delete selected step.
- Target temperature of the current step.
- Step duration. Allows to manage the different options (weight, volume and time) that evaluate the duration of the step.
- Step time.
- Step mode. The fast mode allows to adjust in less time to the selected target value than the slow mode but it can be slightly exceeded.
- Step volume. If set limits the step duration to the volume value. If the volume is equal or greater, it will switch to the next step.
- Step weight. If set limits the step duration to the weight value. If the weight is equal or greater, it will switch to the next step.
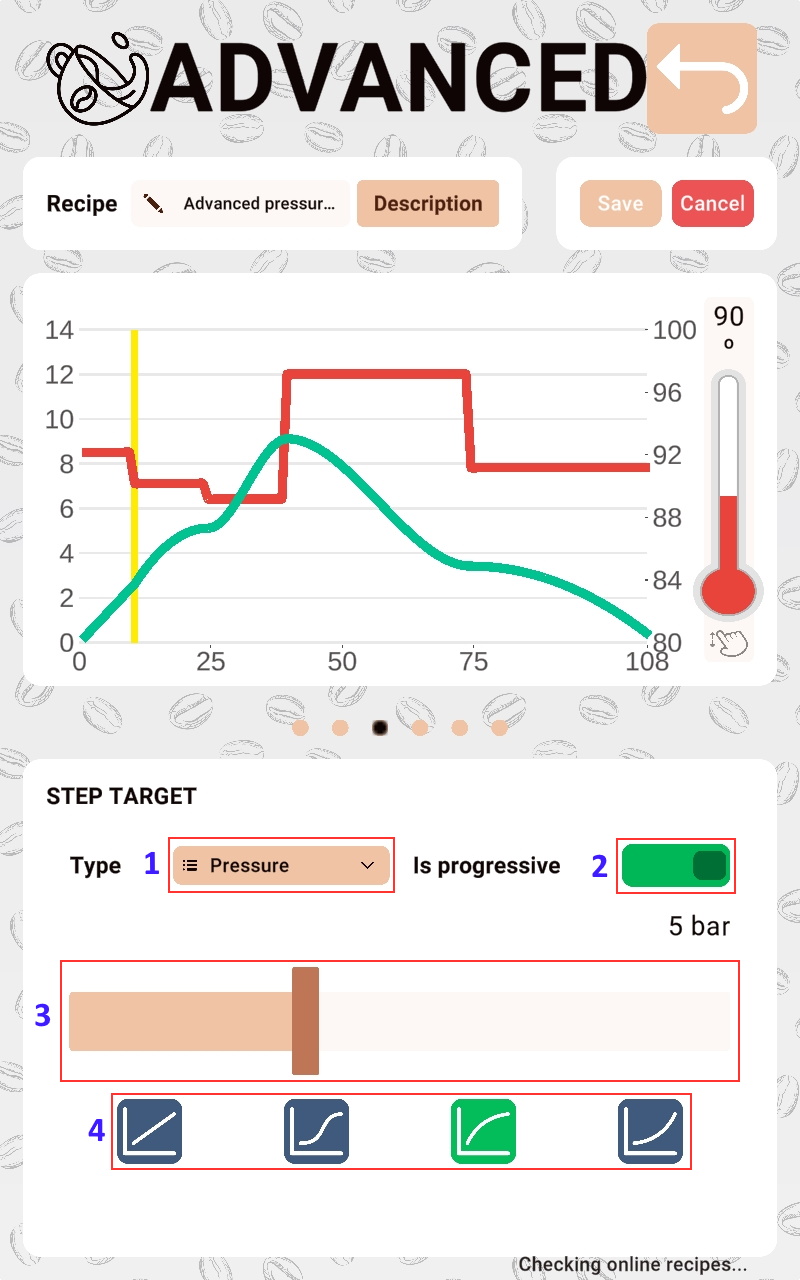
Target
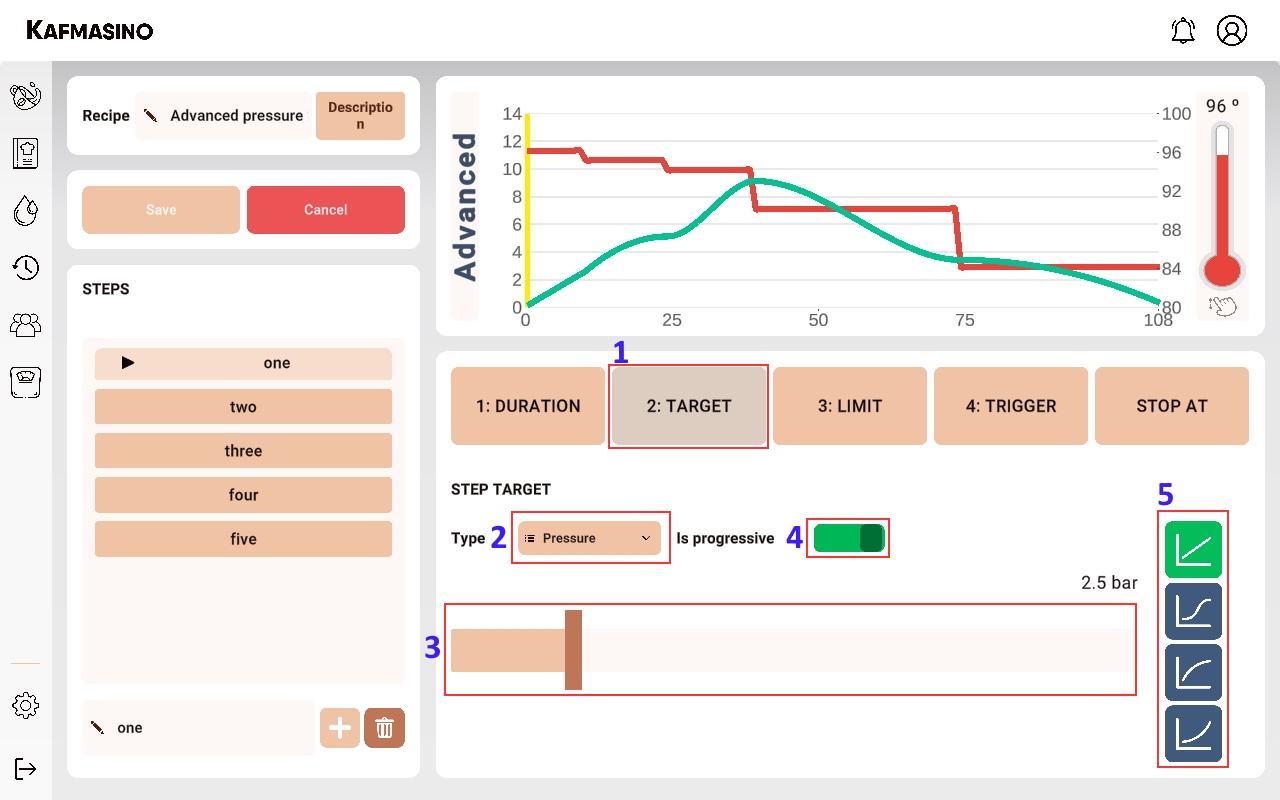
- Step target. Allows to define the target of the selected step.
- Target type: flow or pressure.
- Progressive target. If enabled it creates a smoothed curve from the previous step.
- Function describing the target value of the progressive target.
Limit
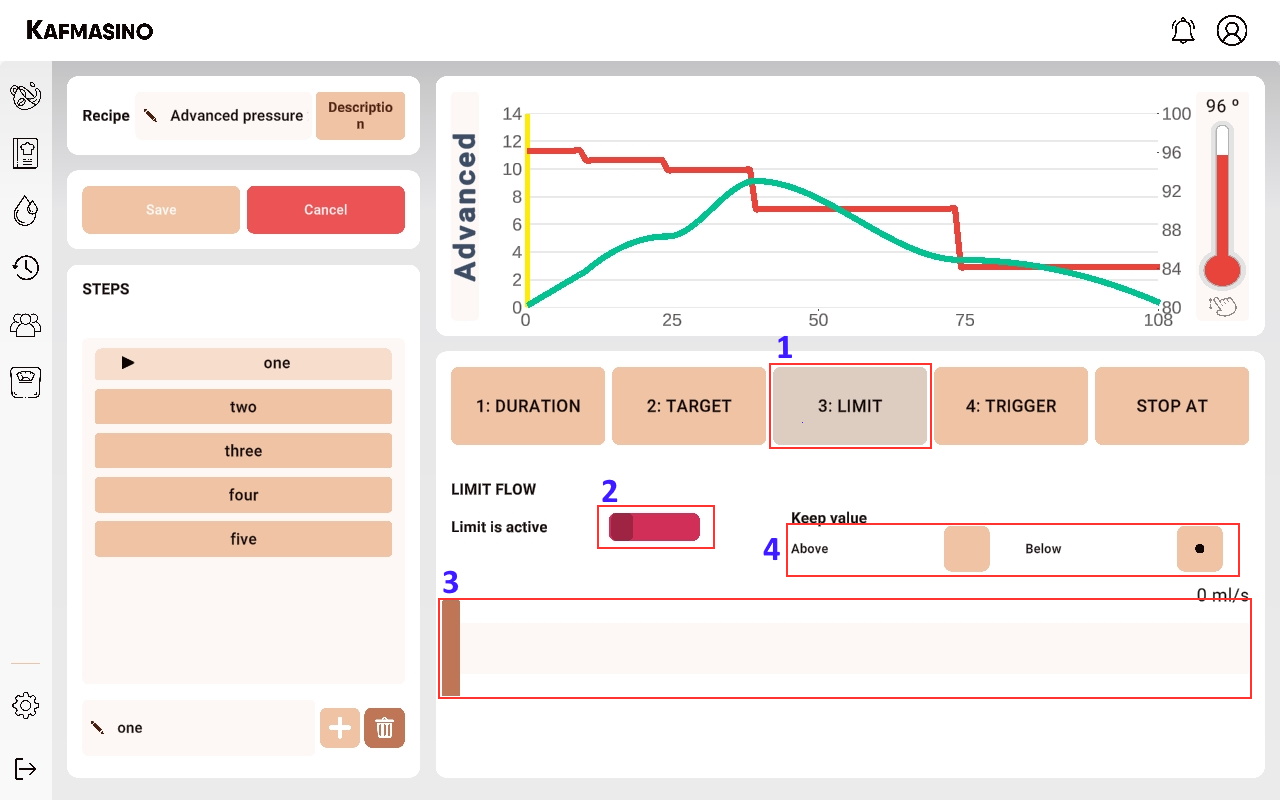
- Step limit. The limit applies to both pressure and flow paths. For pressure steps a flow limit can be set (it will prevent it from being exceeded or always being greater than a set value), for flow steps the limit acts in the same way but for pressure.
- Enable/disable step limit.
- Limit target.
- Defines whether the target value of the limit should remain above or below.
Trigger
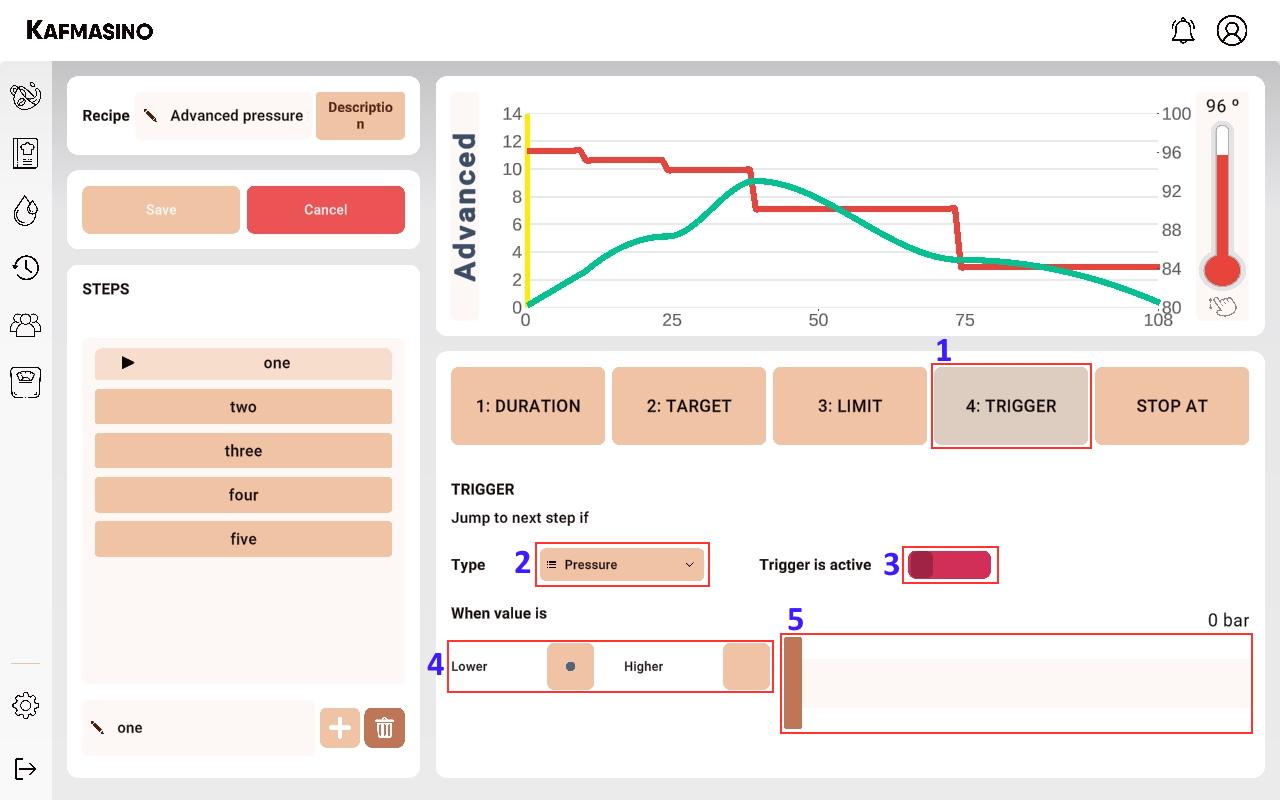
- Step trigger. The trigger allows to jump from the current step to the next step if a pressure or flow condition is met.
- Trigger type: flow or pressure.
- Enable/disable step trigger.
- Condition: above or below.
- Trigger value.
Stop at
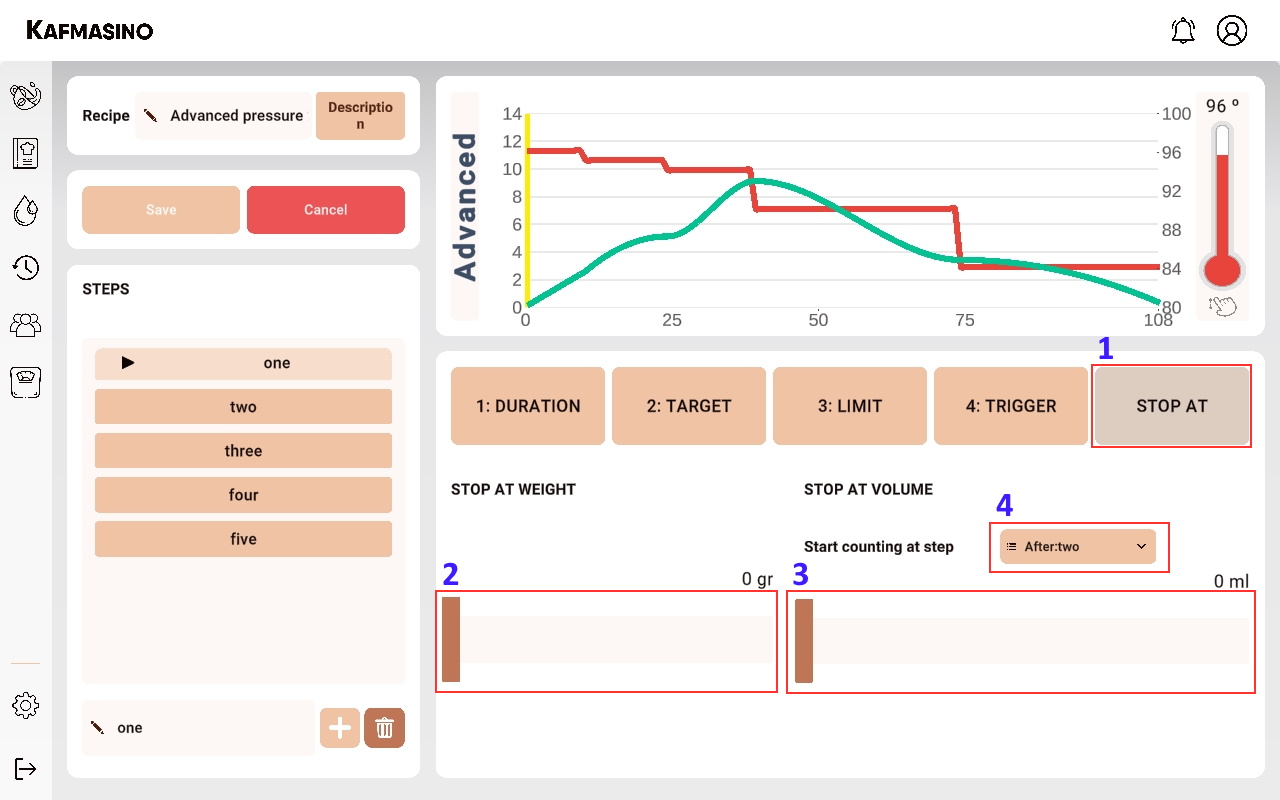
- Stop at. Allows you to stop the infusion if a specific volume or weight is reached.
- Weight target.
- Volume target.
- For the volume, the step at which the volume starts to be counted must be decided. For example, it does not make sense to define pre-infusion as a counting step because you would not reach an adequate weight in the cup, as the coffee puck would absorb the water.
Hot water & steam
From this section you can set up the hot water pouring and adjust the power of the steam wand.
Hot water & steam view
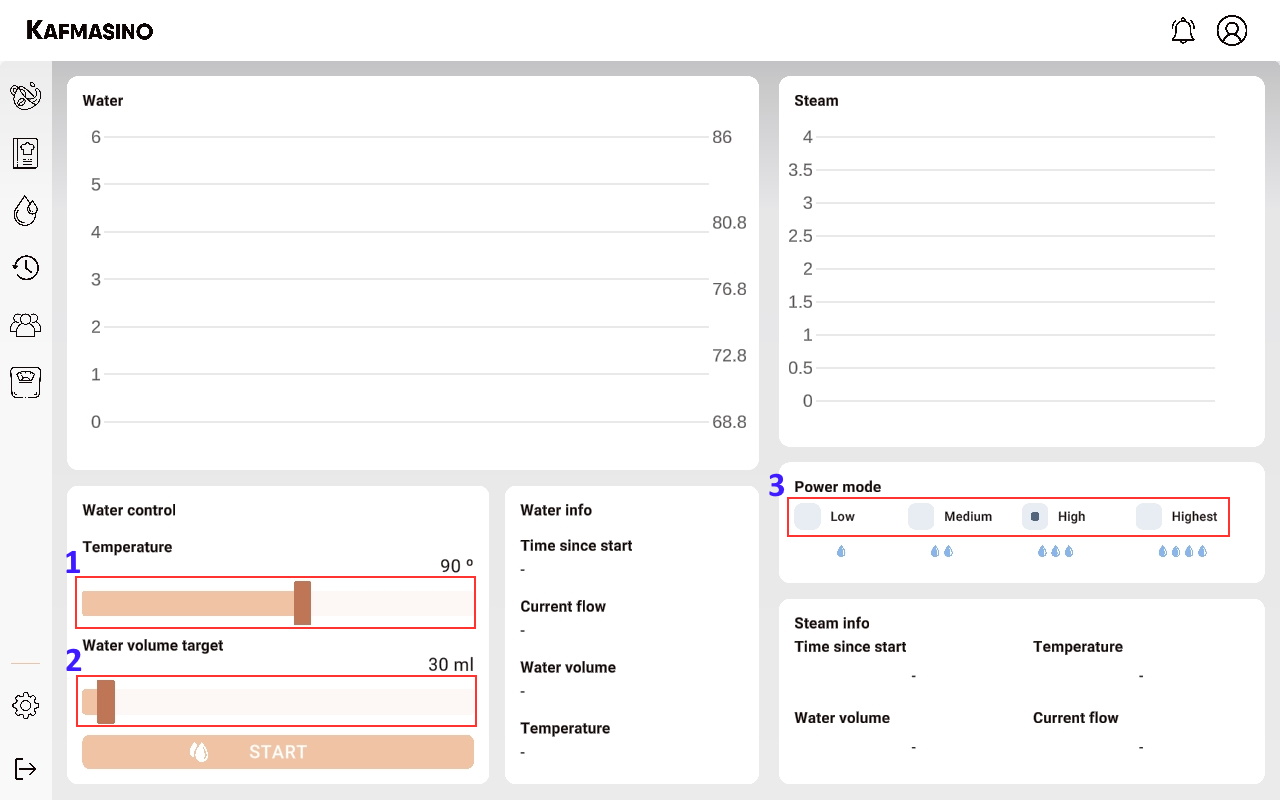
- Hot water temperature target.
- Hot water volume target.
- Steam power mode. It is possible to select between 4 power settings, as the power increases, the steaming time of the milk is reduced but the flow rate is increased so that more milk is poured into the jug.
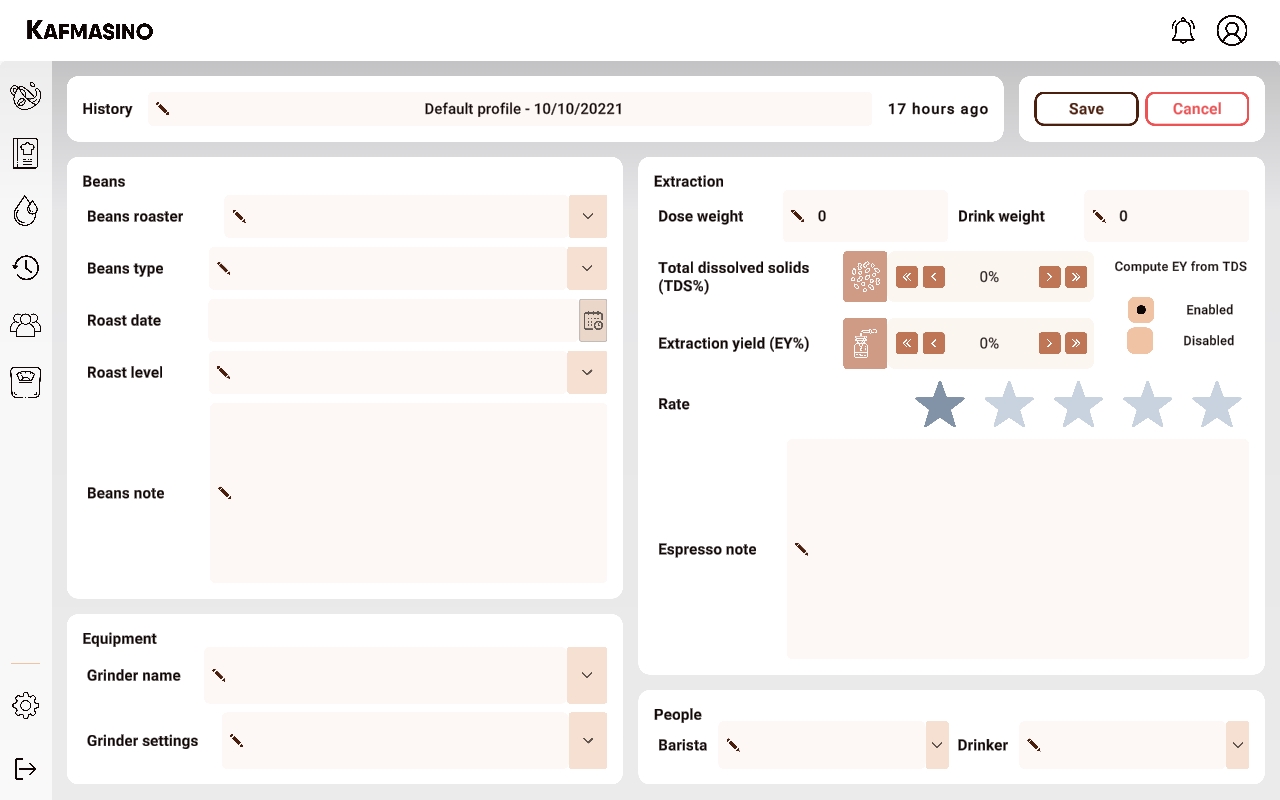
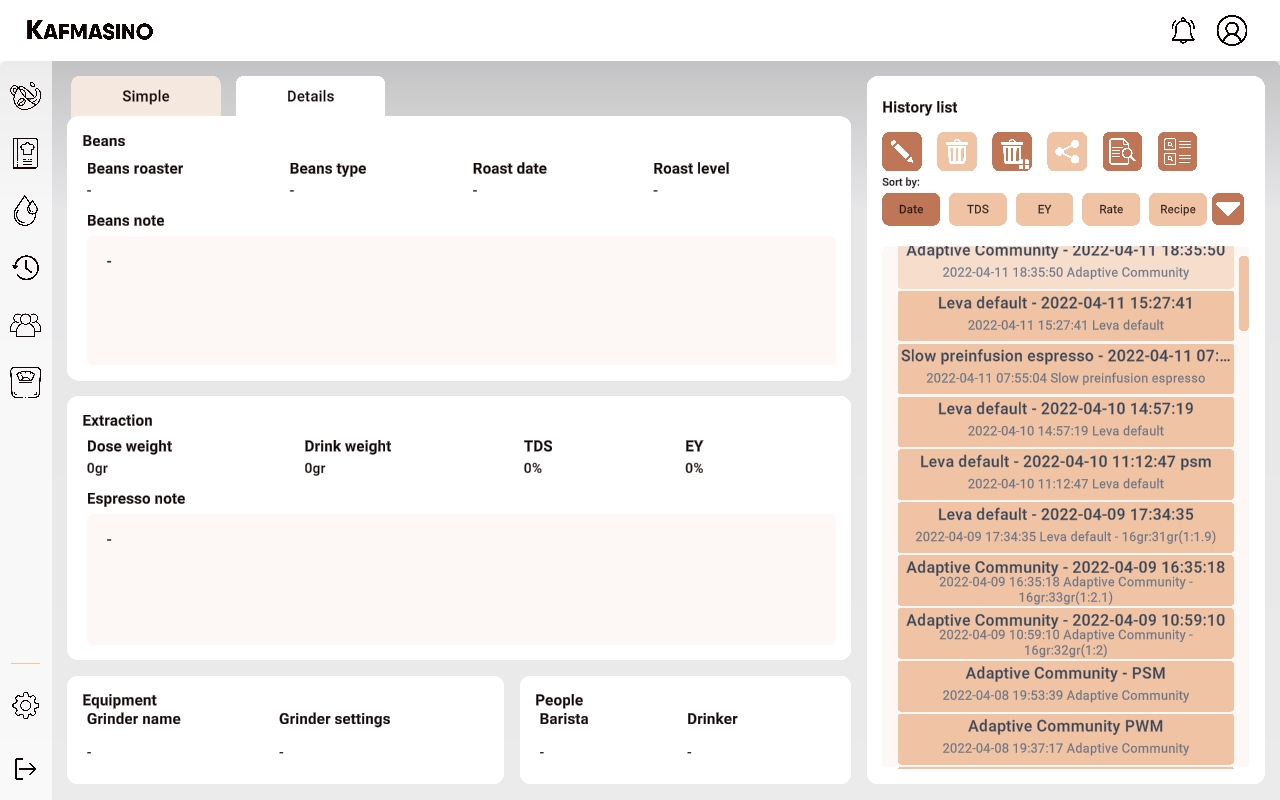
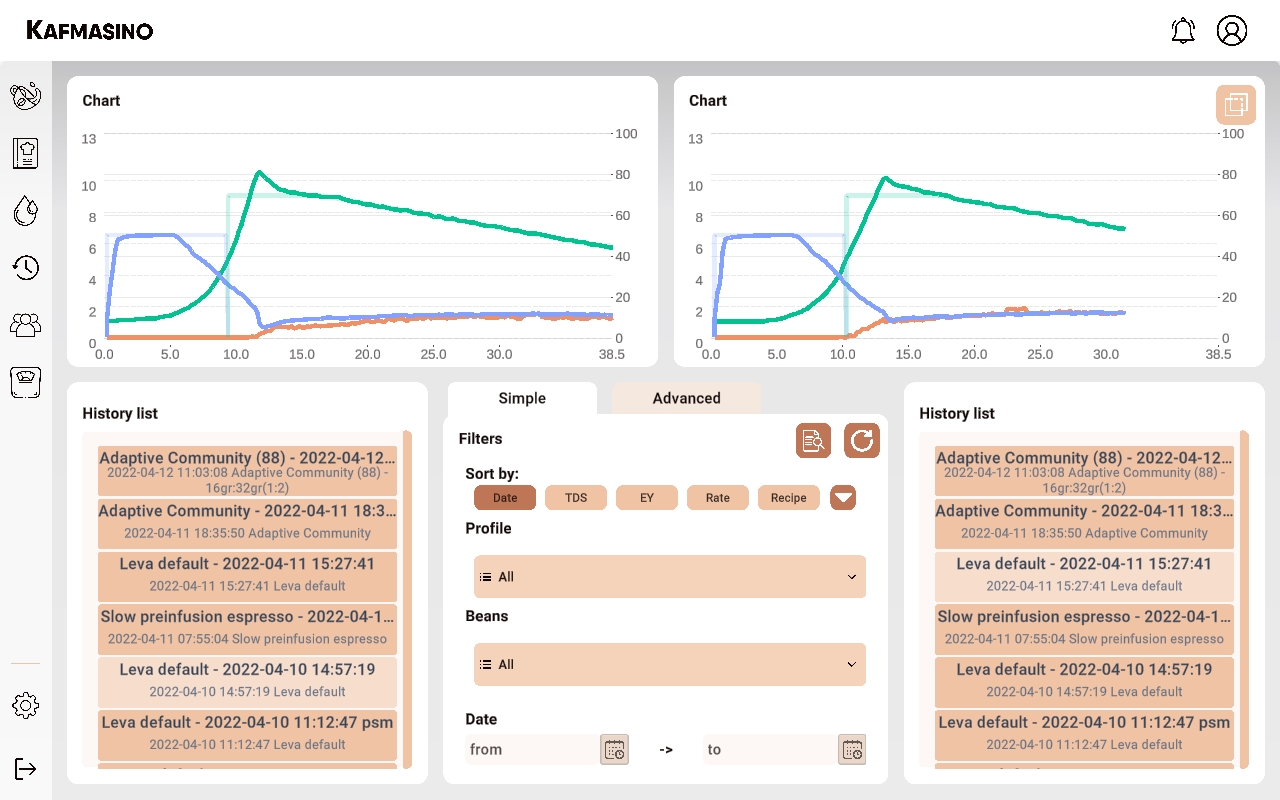
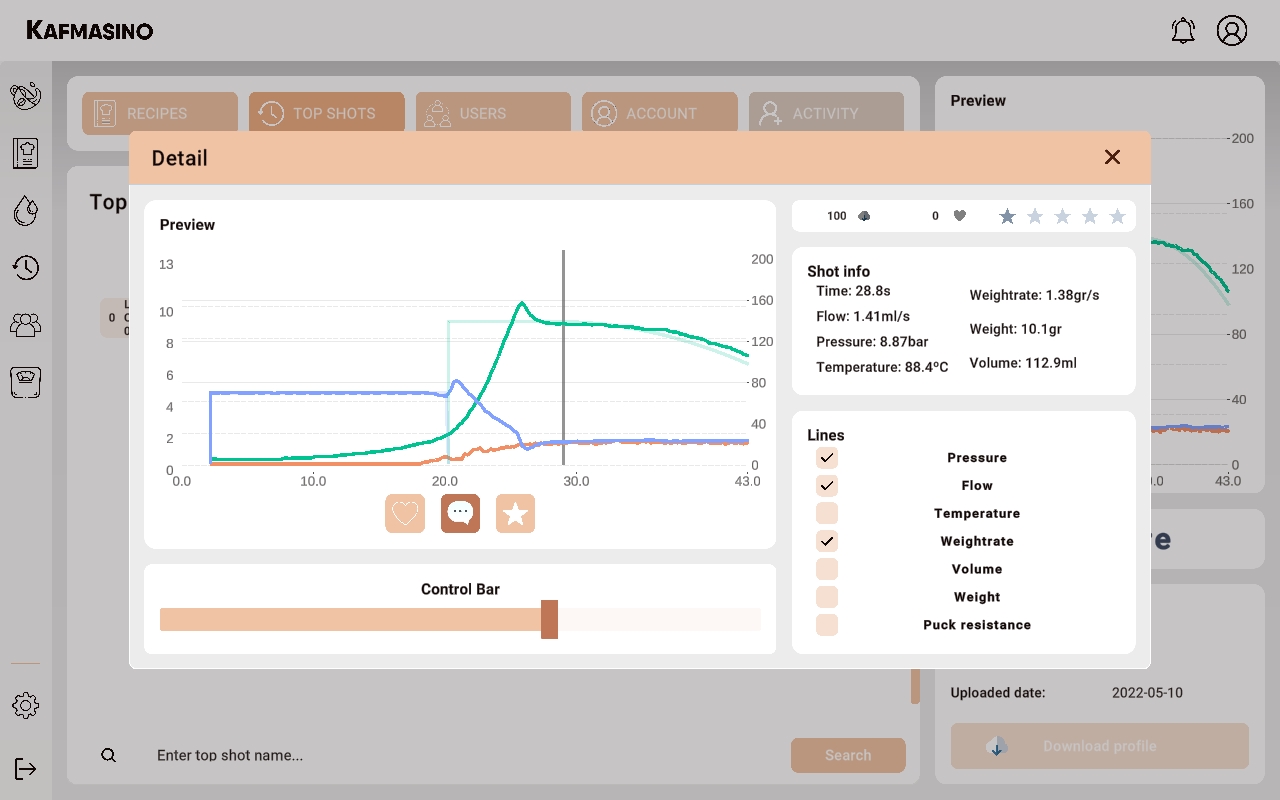
Shot history
From this section you can view the saved shots. You can sort them by different parameters (date, EY, TDS, recipe name, rating). In addition You can also make comparisons between different shots and review the data second by second.
Shot history view
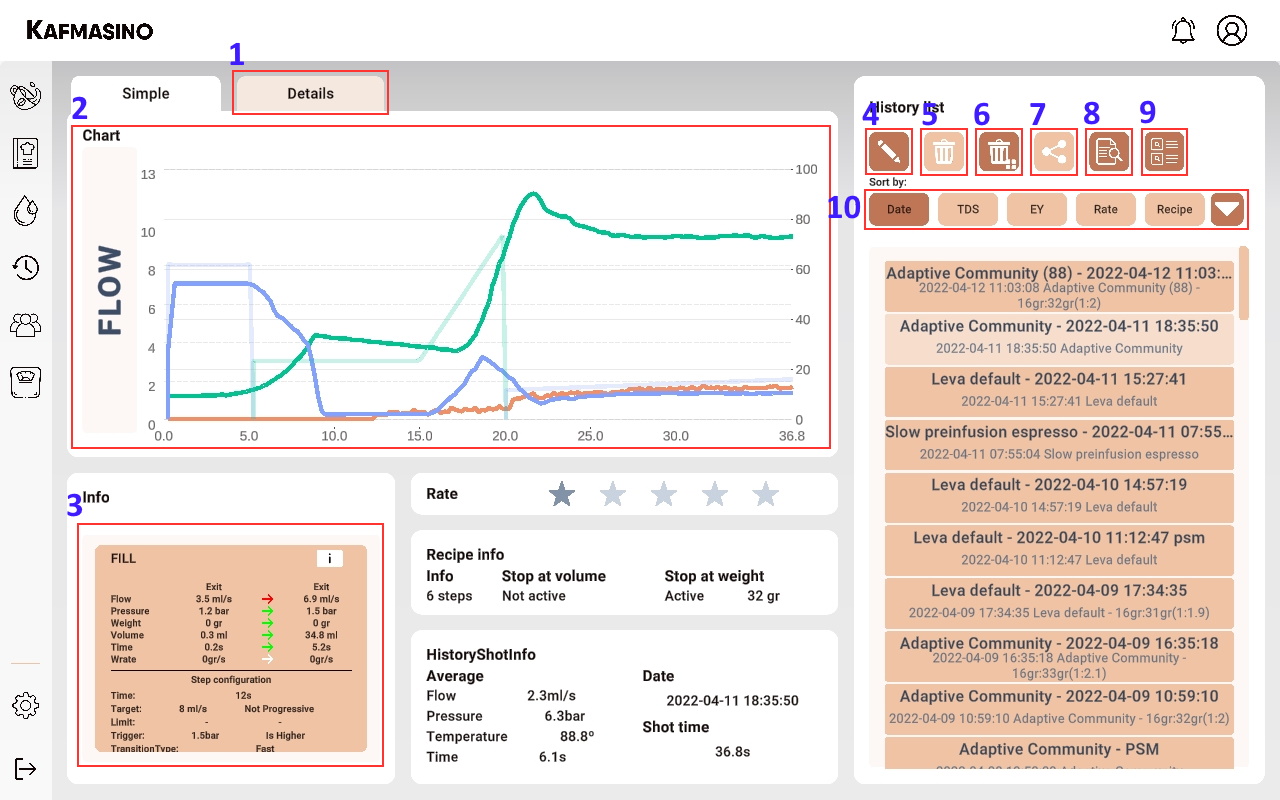
- Details, allows you to see the details of the shot such as: roaster, roast level, tasting notes and the grind level used.
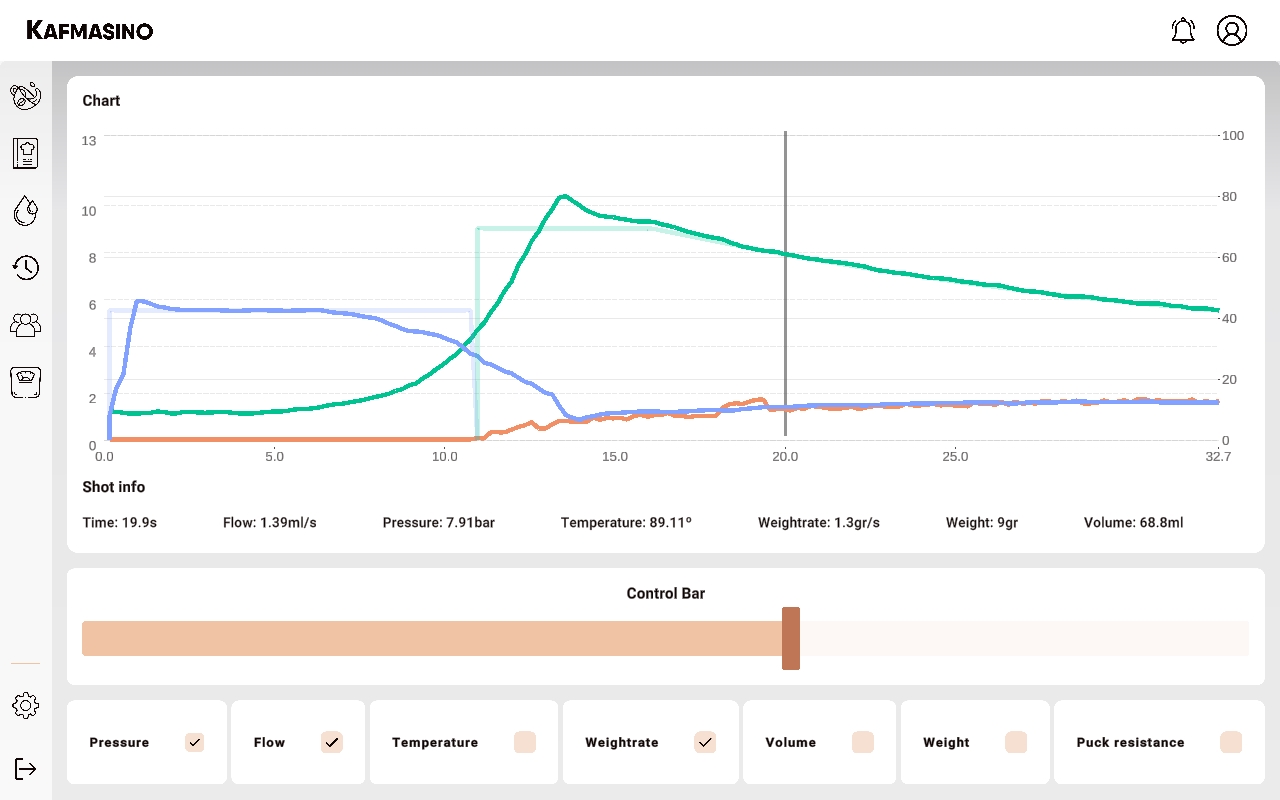
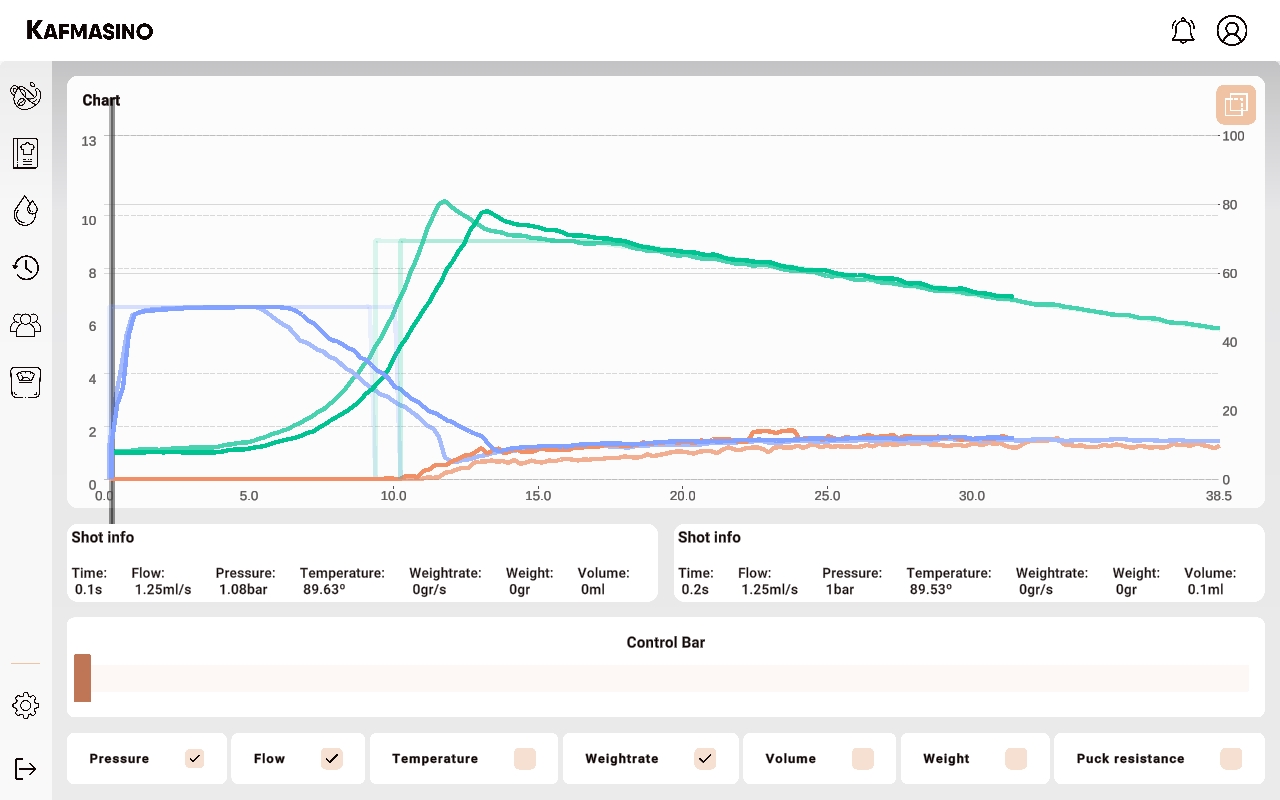
- Clicking on the graph will open it in full screen and you will be able to inspect second by second the values of flow, temperature, extraction, etc. of the extraction.
- In the information box you can see the input and output values of each step, as well as the configuration of each step of the executed recipe.
- The edit icon allows you to modify the details of the selected shot.
- Button to delete the selected shot.
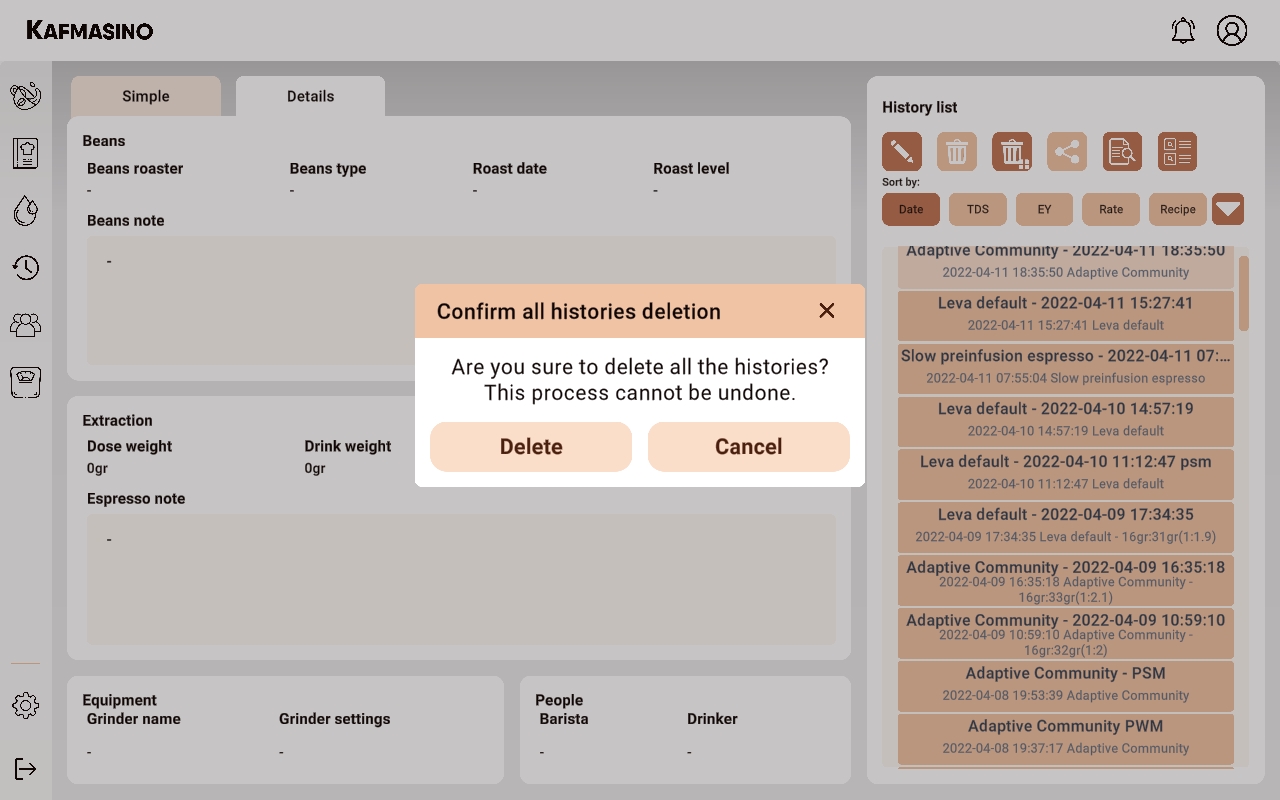
- Button to delete all history shots.
- Button to share the selected shot with the community.
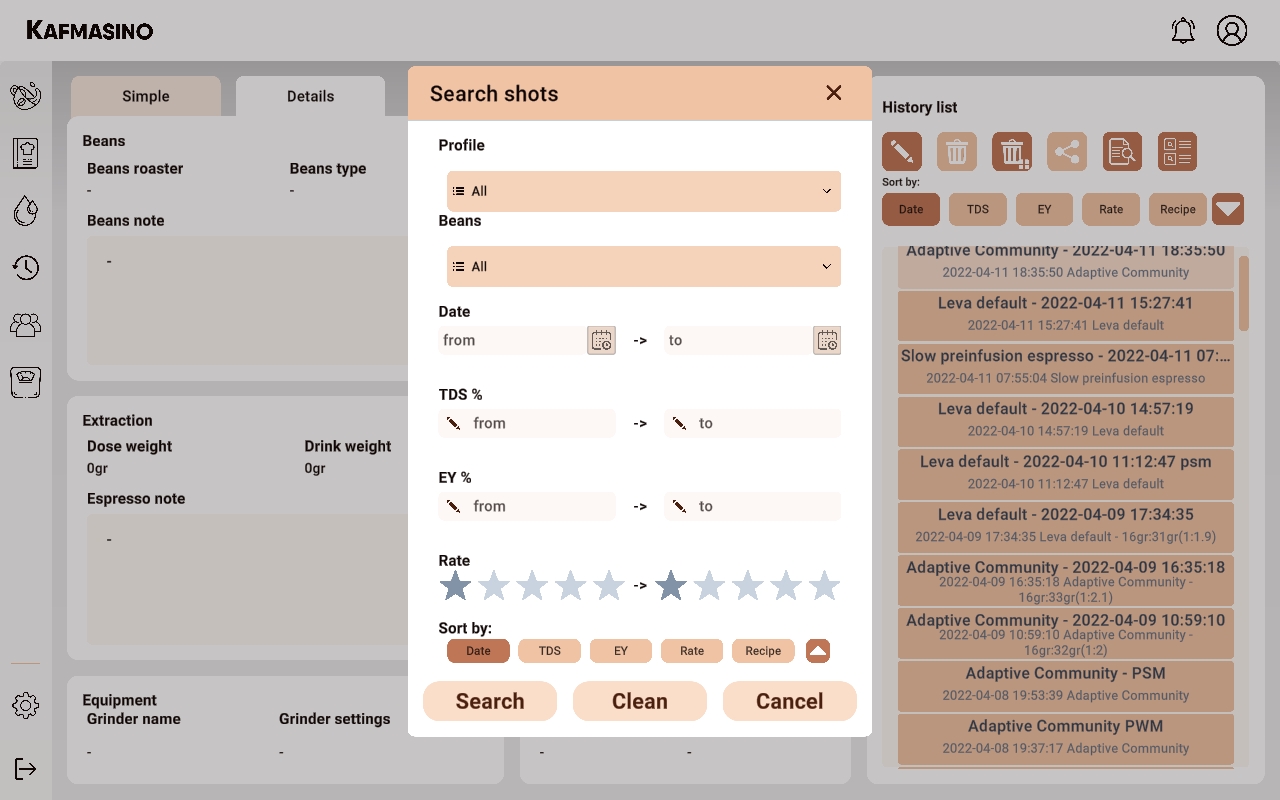
- The advanced search icon allows you to search the shot history by different parameters. For example: date range, rating range, TDS, EY, bean type...
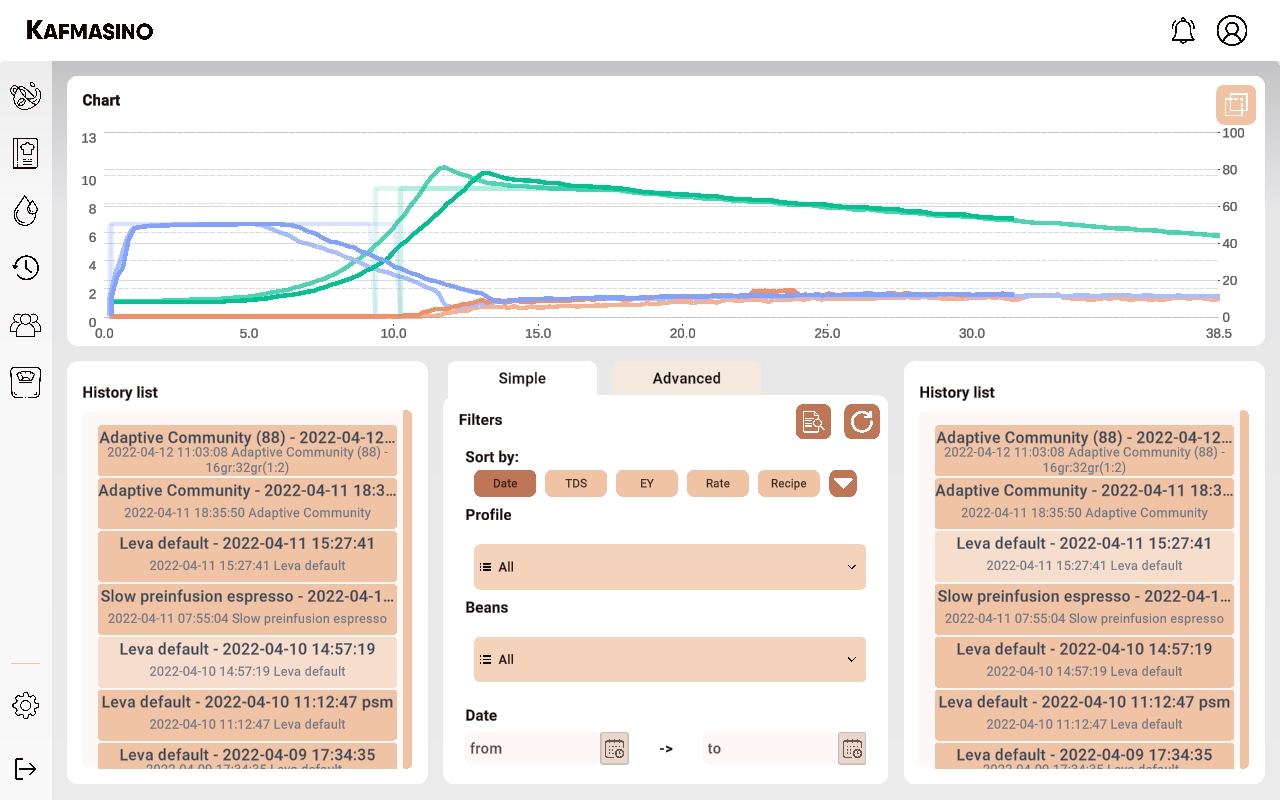
- The recipe comparison icon allows you to access the menu where you can view the behaviour of two shots of the history at the same time, second by second.
- Quick access buttons to sort the list of shots.


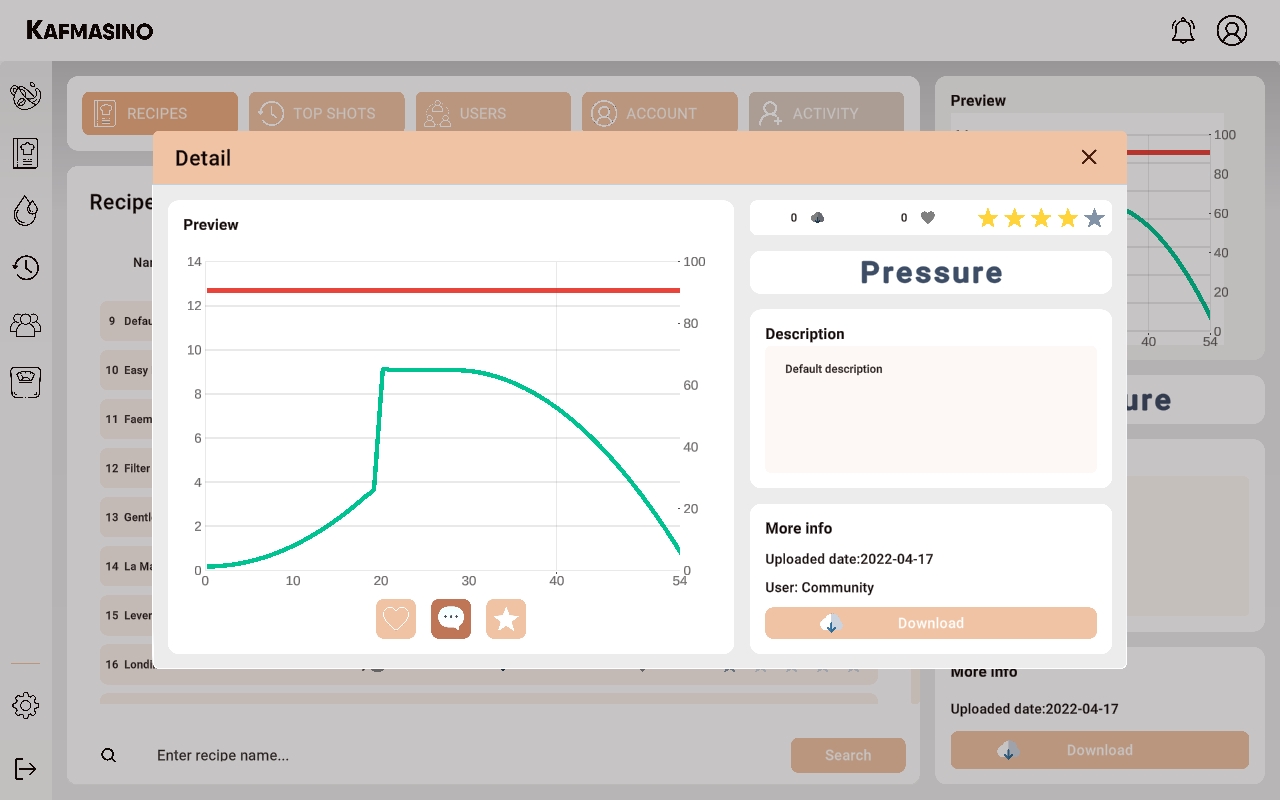
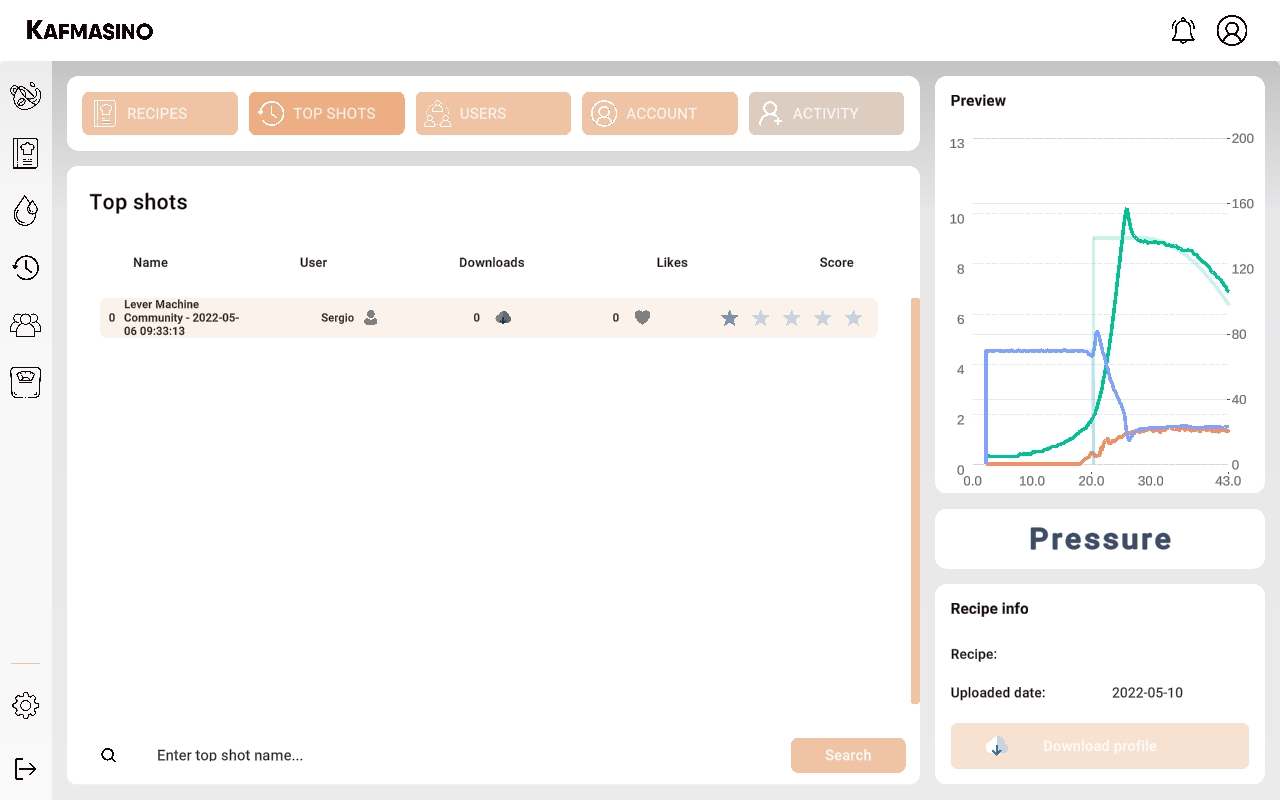
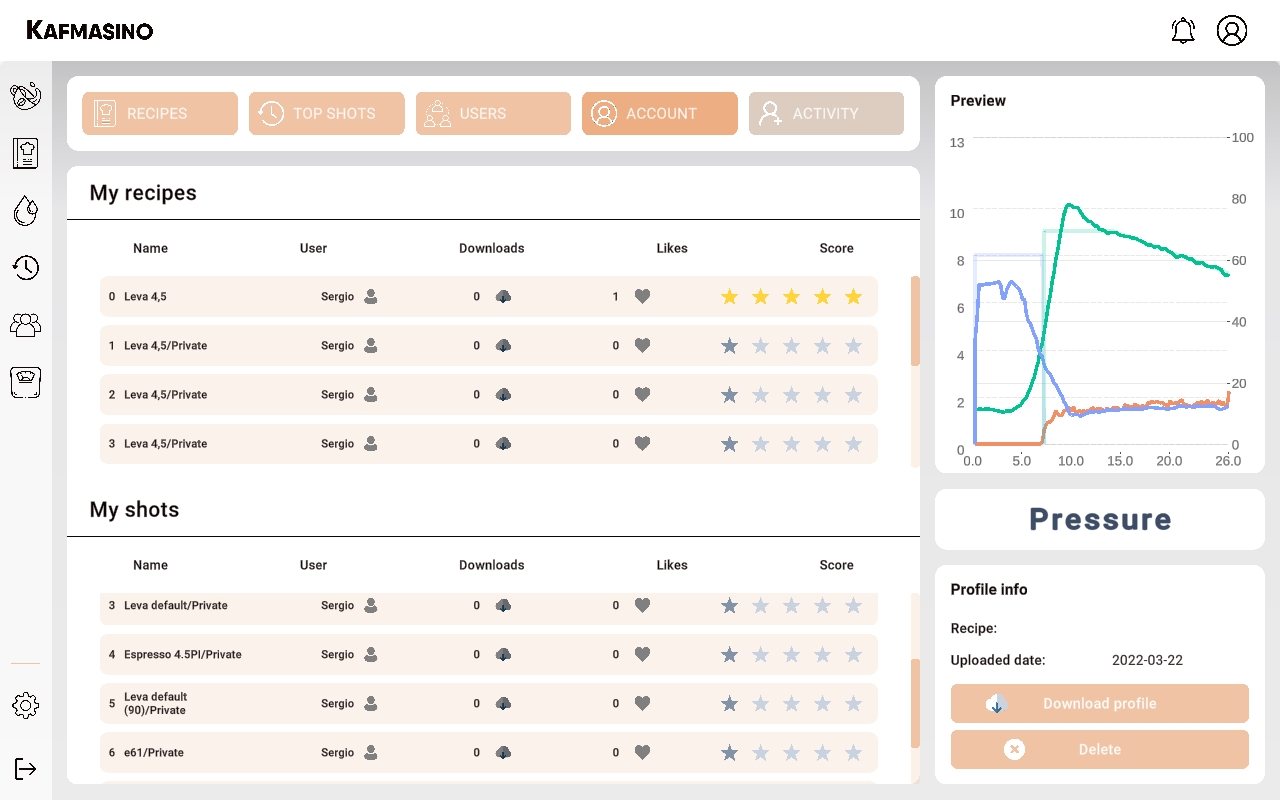
Community
From this section you can view profiles and shots that other users share with the community. You can follow other users and comment on their shots and recipes.
Recipes view

- Recipes. Allows you to view the recipes shared by other users with the community.
- Top shots. It allows you to view other users' shots, rate them and comment on them.
- Users. Allows you to see the recipes that each user has published in the community.
- Account. It allows you to review the shots and recipes you have uploaded to the community publicly and privately.
- Preview of the selected recipe.
- The list will display the recipes returned by the search.
- Search by recipe name.
- Allows you to download the selected recipe for use in your own Kafmasino ONE.
Scale
The scale can be controlled directly from this section. The graphs will show the weight and weight rate during pouring.
Scale view

- The start button will begin to measure the weight and weight rate.
- Scale tare button.
- Select the measurement in grams or ounces.
- The auto-capture automatically detects when liquid has started to be poured to start measuring data.
Settings
A wide range of machine and application parameters can be modified in the configuration section.
Settings options view
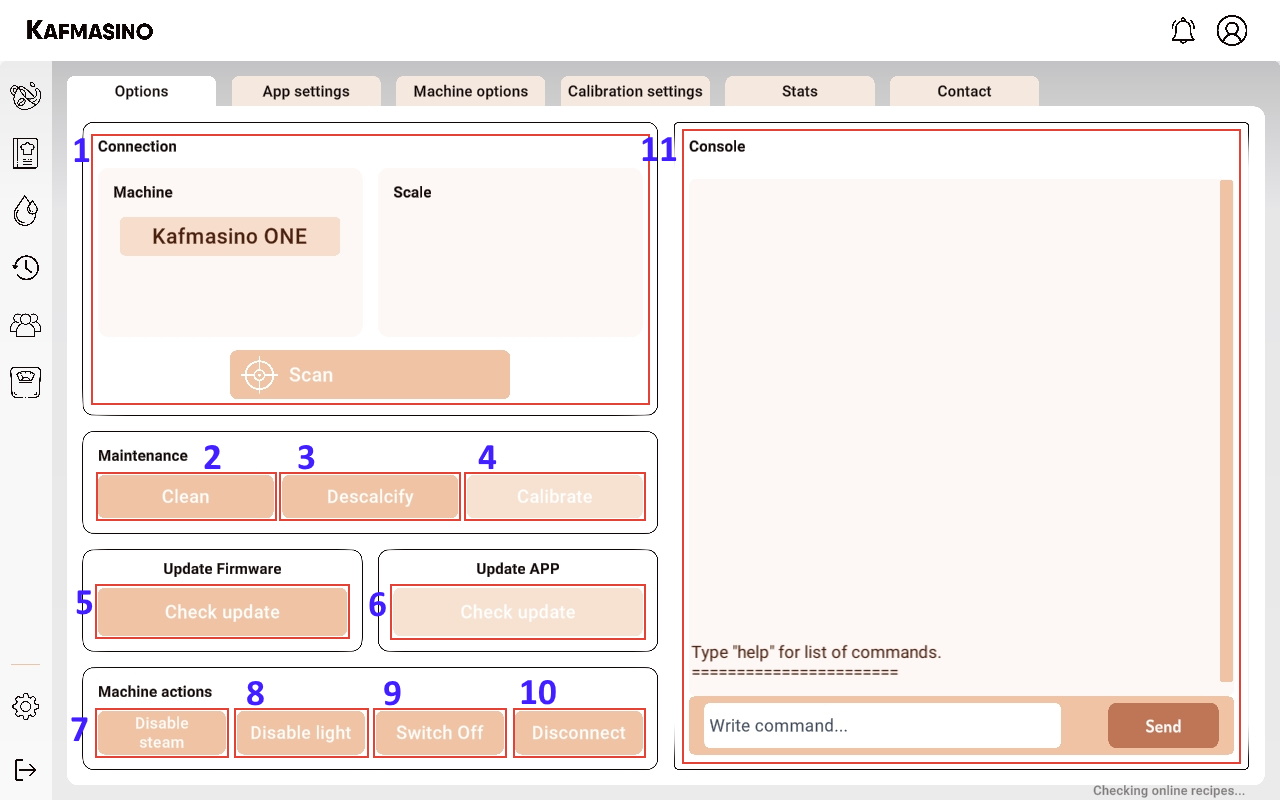
- List of Kafmasino devices nearby. It will show Kafmasino coffee machines and compatible scales.
- Backflush routine for cleaning the unit with a blind basket.
- Boiler and thermoblock descaling routine.
- Flow calibration of the vibratory pump using a compatible scale.
- Search for Kafmasino ONE machine firmware update.
- Application update search (also available on Play Store and Apple Store).
- Deactivates/activates the thermoblock. Useful when not using steam to save energy.
- Deactivates/deactivates the drip tray light.
- Turns the machine on or off.
- Disconnect the application from the machine.
- The console displays relevant information about the status of the application with the machine. Commands can be sent and debug information can be collected.
Settings app settings view
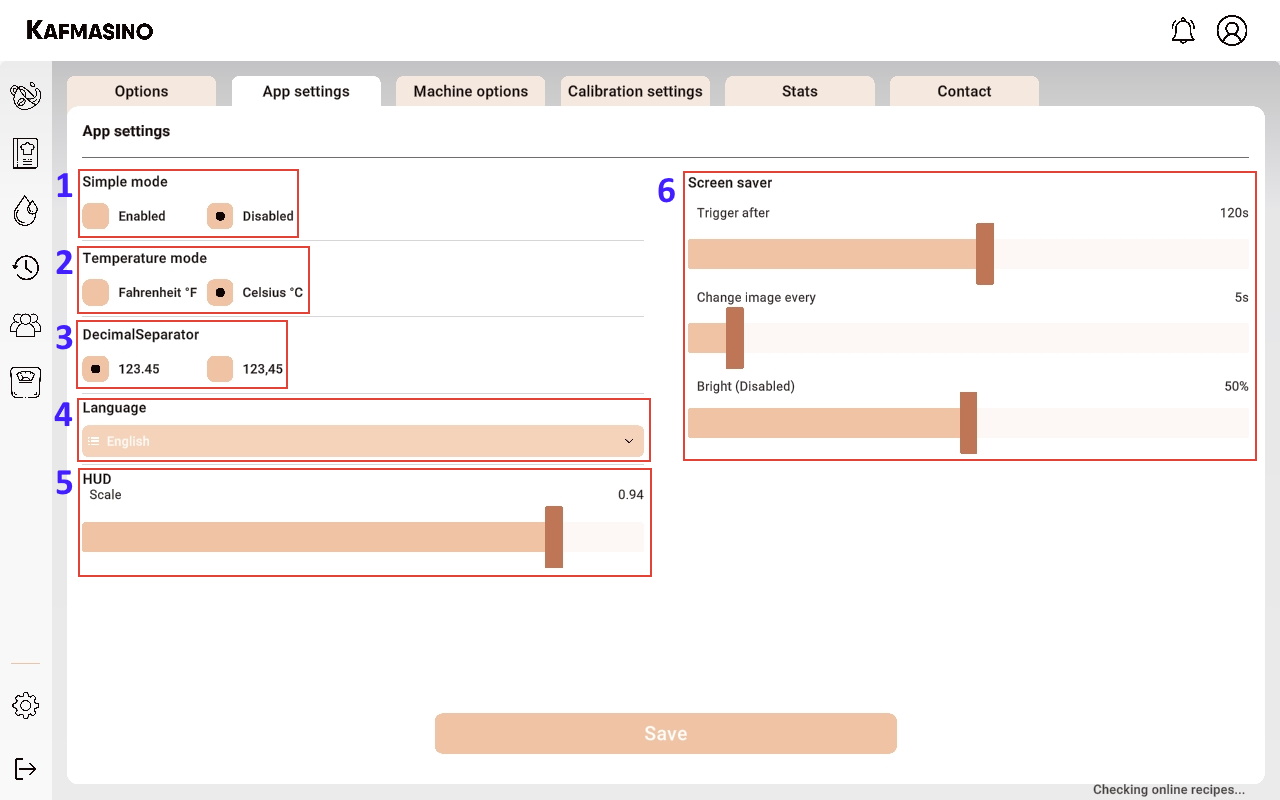
- Enables or disables the simple mode.
- Temperature measurement units.
- Decimal separator (point or comma).
- Language of the application. A restart of the application is required to apply the change.
- Scaling of the Head-Up Display allows you to increase or decrease the size of the different elements of the application.
- Screen saver settings.
Settings machine options view
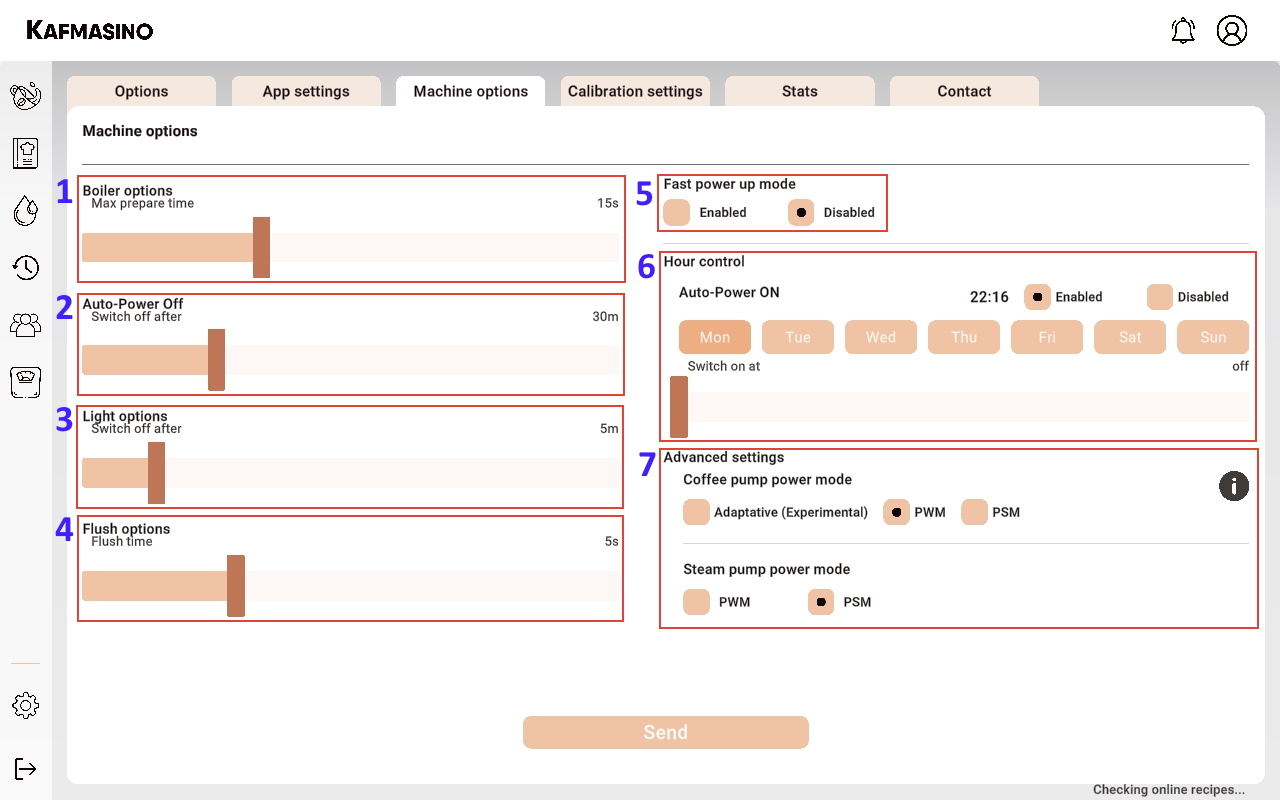
- Maximum preheating time before starting a coffee or pouring hot water through the grouphead.
- Idle time after which the machine will automatically shut down.
- Idle time after which the machine light will automatically switch off.
- Flush time.
- Ignition mode setting. Fast mode increases the boiler temperature above the temperature specified in the stored recipe for faster start-up. Slow mode is more conservative and tries to always adjust to the temperature of the stored recipe.
- Time control for automatic machine start-up.
-
Pump control mode for pump in infusion and steam mode.
- Adaptive: a mode that combines the best of the two pump control modes.
- PWM (Pulse Width Modulation): pump control mode especially suitable for high flows and pressures. Allows very smooth pressure curves to be obtained.
- PSM (Pulse Skip Modulation): pump control mode suitable for low flow rates. It allows to obtain a high precision in the selected flow rate.
Settings calibration view
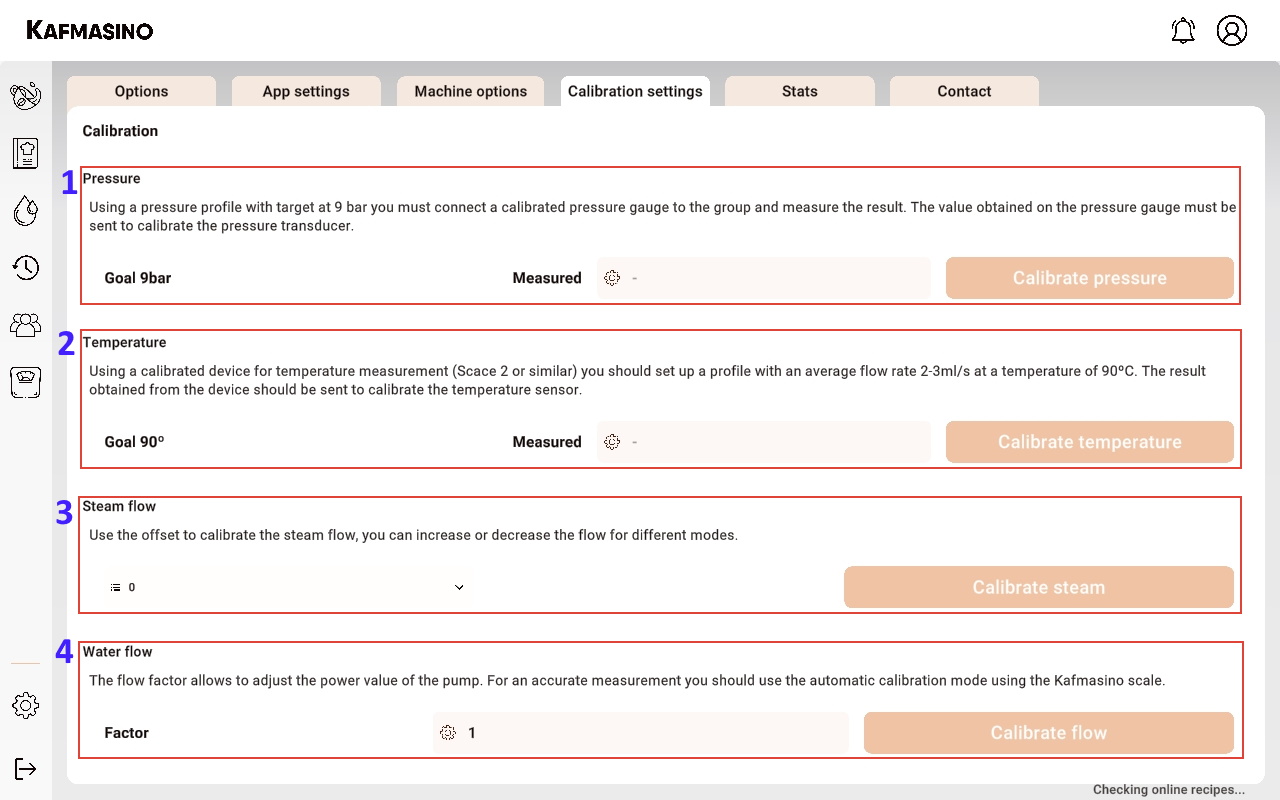
Please do not use this configuration tab if you do not know what you are doing. You may misadjust the machine and render it unusable.
- Machine pressure calibration.
- Machine temperature calibration.
- Steam calibration offset.
- Vibratory pump flow calibration factor.
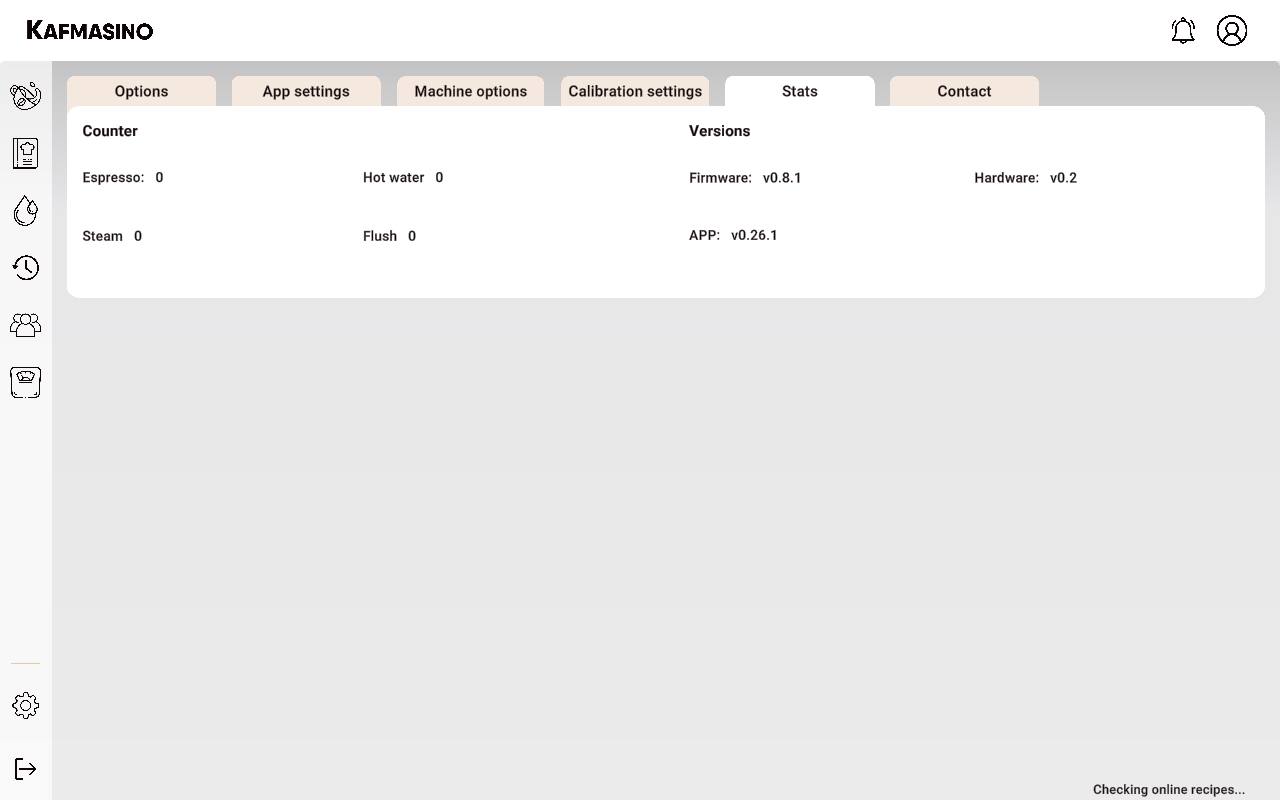
Settings stats view
Displays application and coffee machine information and statistics.
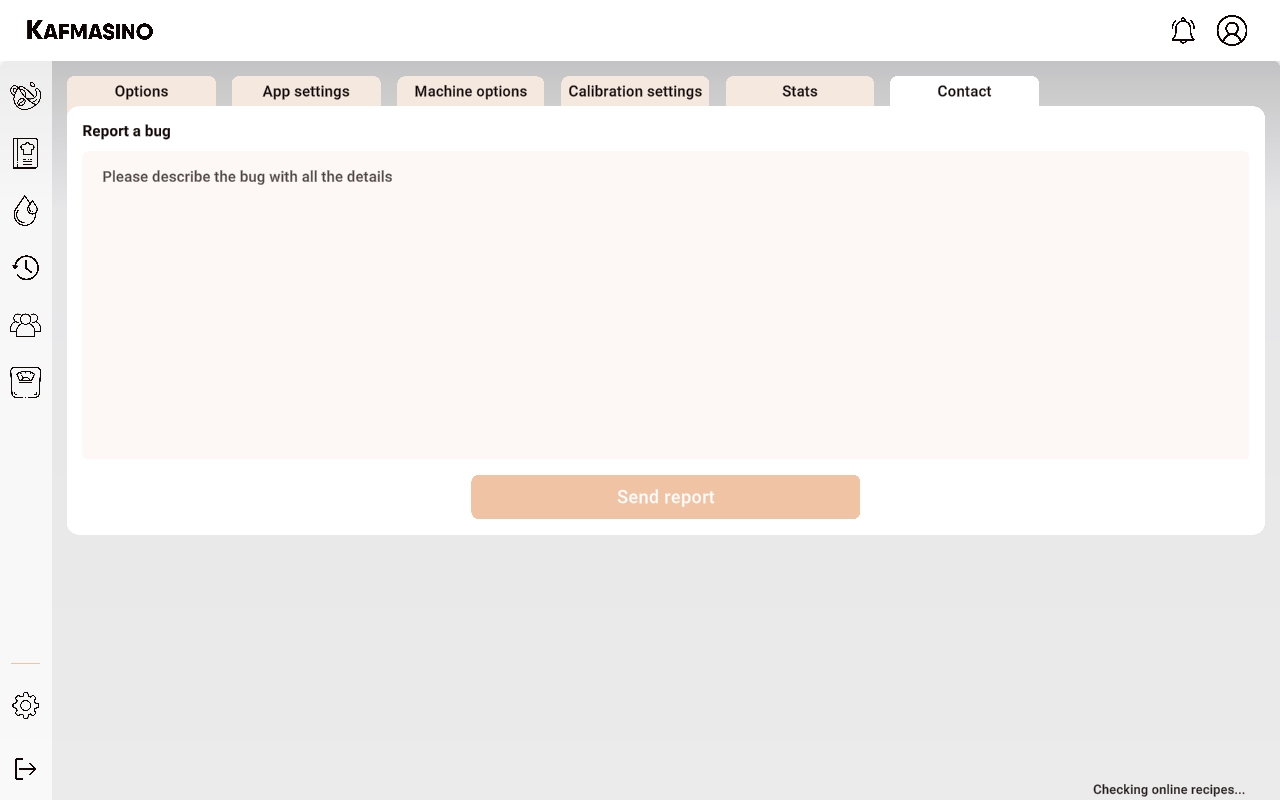
Settings contact view
Contact screen for sending information or bug reports to Kafmasino developers.
Coffee
From the Coffee section you can control the infusion at all times, and you also have a series of interesting data that allow you to visualise at all times what is happening in the extraction.
Coffee view
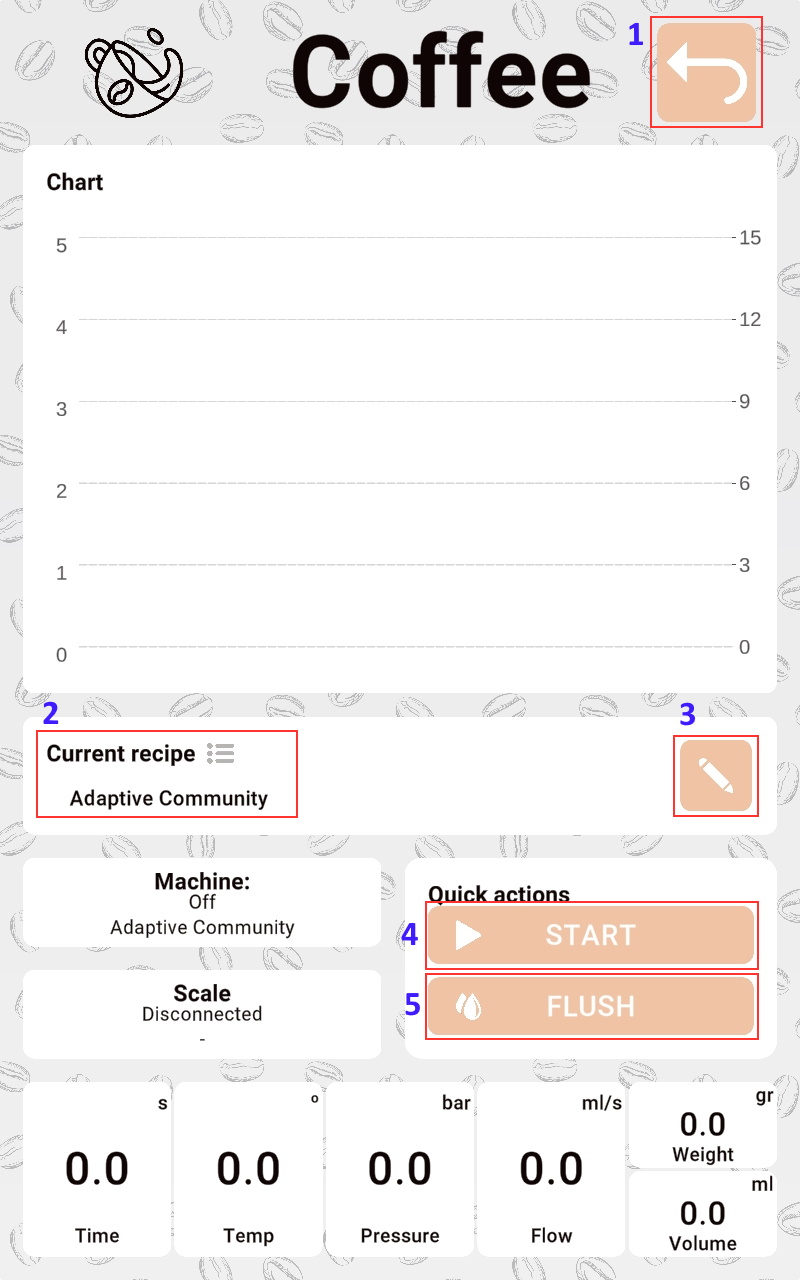
- Go back to previous view.
- Clicking on the current profile will display a quick selector of the stored profiles. This allows you to send directly without having to access the recipe screen.
- By clicking on the edit icon, the temperature parameters and the cup weight setting can be modified. This option will only apply if the scale is switched on at the time of brewing.
- The curved arrow icon allows you to advance to the next step of the recipe when making coffee.
- Press to start infusion.
- Rinse the grouphead to clean.
- Scale tare. It is not necessary to run a tare before starting an infusion as it is automatically tared.
- By clicking on the icon, the operation of the infusion is modified. The manual mode allows the flow and pressure to be changed at any time.
- By repeatedly clicking on the graph, the size of the graph can be changed.
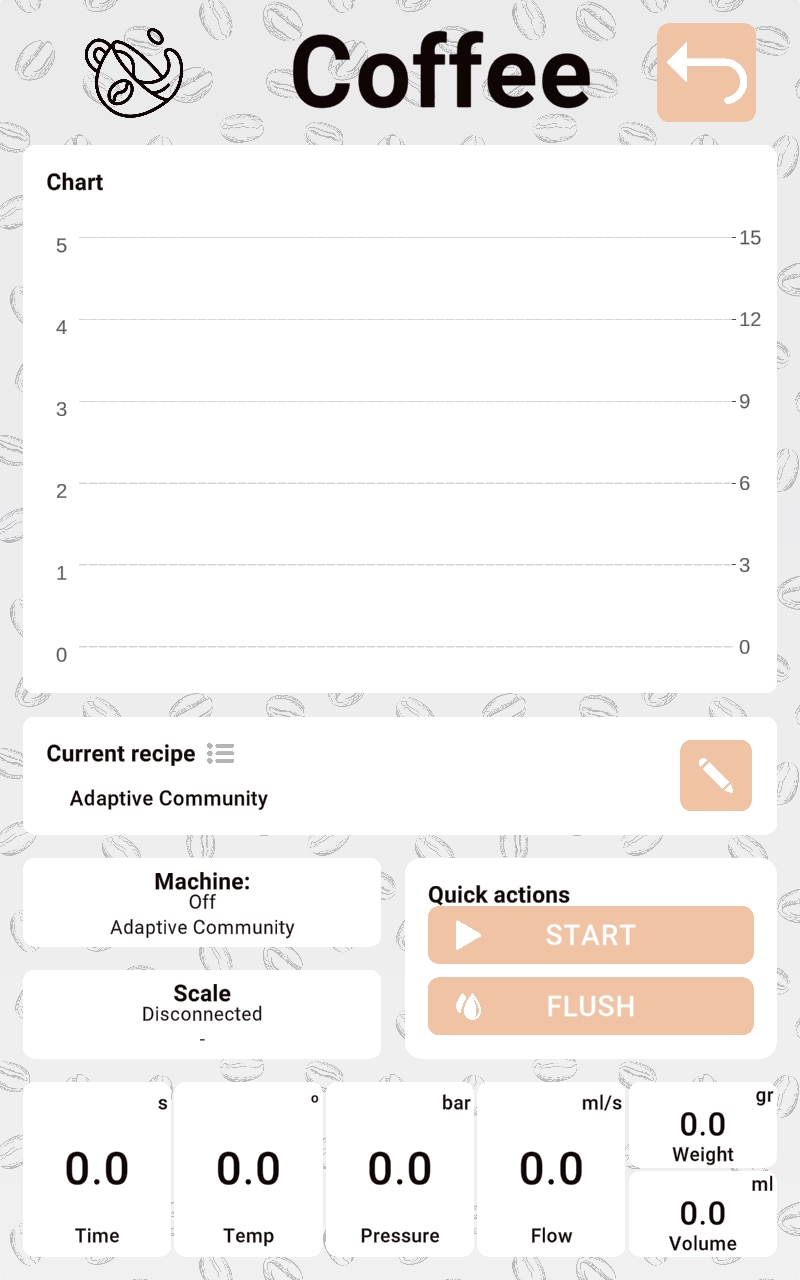
Simple mode
The application allows you to configure a simple mode that hides graphics and extra information.
Recipes
From this section you can modify the operation of the recipes. Basic recipes can be created based on pressure or flow. In addition, you can also create advanced recipes with which you can modify any combination of parameters and triggers.
Recipes view
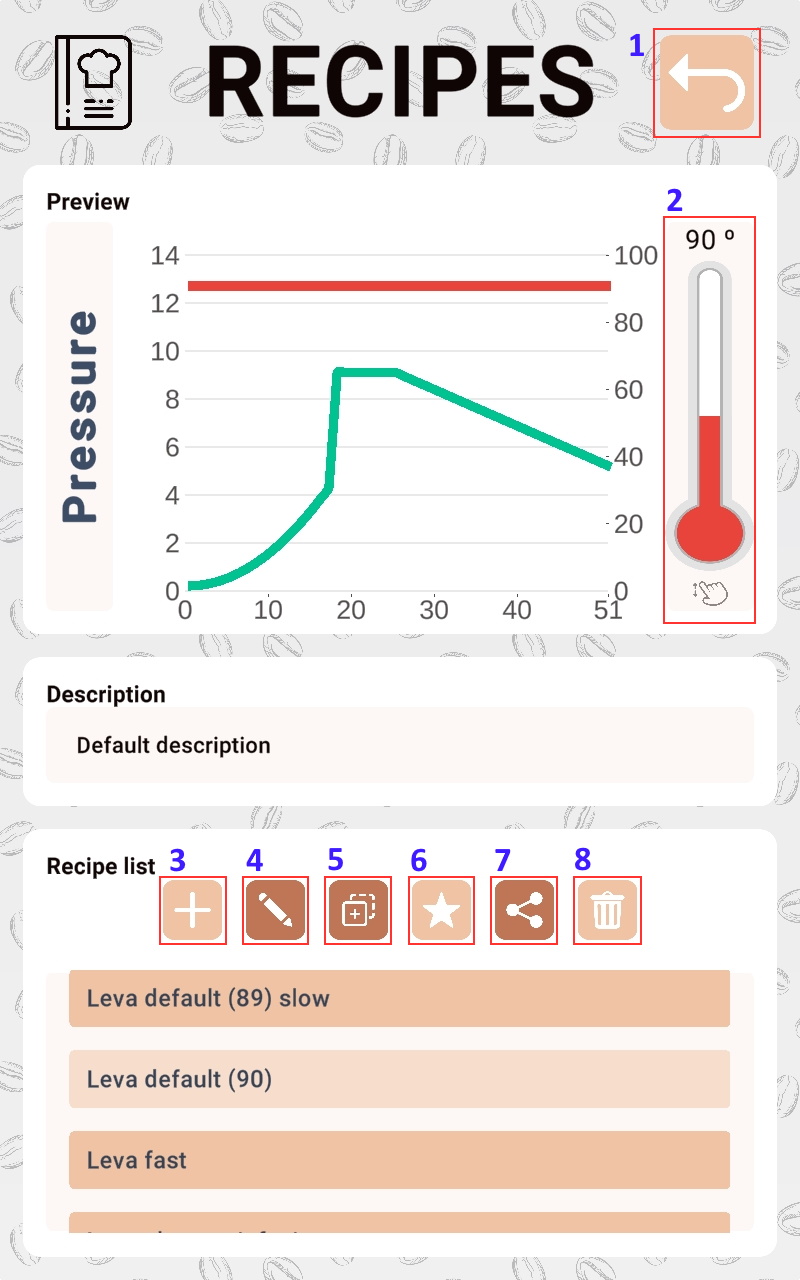
- Go back to previous view.
- By pressing the temperature thermometer, the temperature of a recipe can be raised or lowered in a simple way.
- Button to create a new recipe.
- Button to edit the selected recipe.
- Button to duplicate the selected recipe.
- Button to store the recipe in the internal storage of the machine.
- Button to share the selected recipe with the community.
- Button to delete the selected recipe.
Flow recipes
- Recipe name.
- Recipe description (optional).
- Recipe brew temperature.
- Preinfusion step mode. The fast mode allows to adjust in less time to the selected target value than the slow mode but it can be slightly exceeded.
- Maximum preinfusion step time
- Preinfusion step trigger. Exceeding the selected value will switch to the infusion step.
- Preinfusion flow target value.
- Infusion step mode. The fast mode allows to adjust in less time to the selected target value than the slow mode but it can be slightly exceeded.
- Infusion step time
- Infusion step limit. Maximum allowable pressure value. If the pressure limit value is reached it is used as a limiting value so that the flow target value of the step will not be applied.
- Infusion flow target value.
- Decline step mode. The fast mode allows to adjust in less time to the selected target value than the slow mode but it can be slightly exceeded.
- Decline step time
- The volume or weight value that allows the infusion to stop automatically. Weight stop is only available when the scale is connected to the application.
- Decline flow last target value.
- Function describing the target value of the decline step.
Pressure recipes
- Recipe name.
- Recipe description (optional).
- Recipe brew temperature.
- Preinfusion step mode. The fast mode allows to adjust in less time to the selected target value than the slow mode but it can be slightly exceeded.
- Maximum preinfusion step time
- Preinfusion flow target value.
- Preinfusion step trigger. Exceeding the selected value will switch to the infusion step.
- Infusion step mode. The fast mode allows to adjust in less time to the selected target value than the slow mode but it can be slightly exceeded.
- Infusion step time
- Infusion step limit. Maximum allowable flow value. If the flow limit value is reached it is used as a limiting value so that the pressure target value of the step will not be applied.
- Infusion pressure target value.
- Decline step mode. The fast mode allows to adjust in less time to the selected target value than the slow mode but it can be slightly exceeded.
- Decline step time
- The volume or weight value that allows the infusion to stop automatically. Weight stop is only available when the scale is connected to the application.
- Decline pressure last target value.
- Function describing the target value of the decline step.
Advanced recipes
Advanced recipes allow you to create any combination of flow and pressure steps. The temperature of each step can be modified and triggers can be activated by pressure, flow and volume.
Step list

- Recipe name.
- Recipe description (optional).
- Indicates the step that is currently being modified.
- Step name.
- Add new step.
- Delete selected step.
- Target temperature of the current step.
Duration
Step duration. Allows to manage the different options (weight, volume and time) that evaluate the duration of the step.
- Step time.
- Step mode. The fast mode allows to adjust in less time to the selected target value than the slow mode but it can be slightly exceeded.
- Step volume. If set limits the step duration to the volume value. If the volume is equal or greater, it will switch to the next step.
- Step weight. If set limits the step duration to the weight value. If the weight is equal or greater, it will switch to the next step.
Target
- Target type: flow or pressure.
- Progressive target. If enabled it creates a smoothed curve from the previous step.
- Step target. Allows to define the target of the selected step.
- Function describing the target value of the progressive target.
Limit
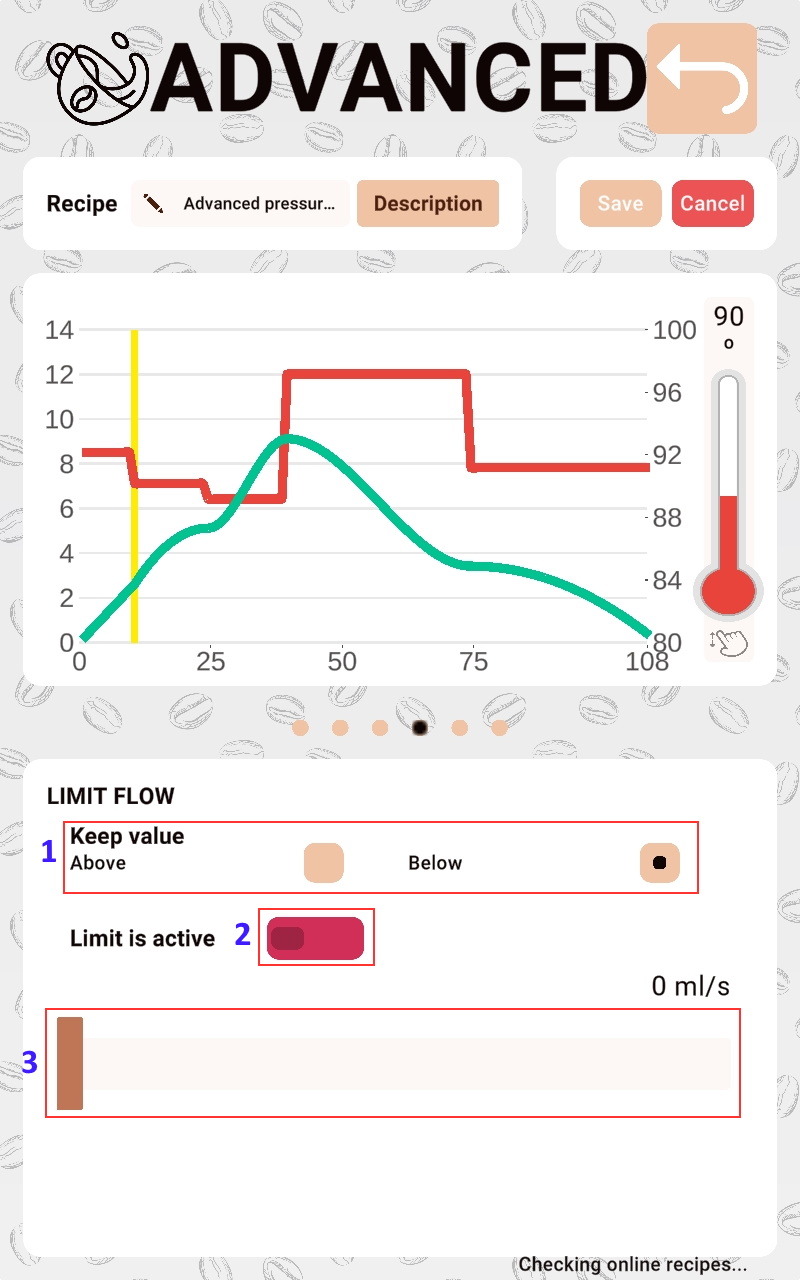
Step limit. The limit applies to both pressure and flow paths. For pressure steps a flow limit can be set (it will prevent it from being exceeded or always being greater than a set value), for flow steps the limit acts in the same way but for pressure.
- Defines whether the target value of the limit should remain above or below.
- Enable/disable step limit.
- Limit target.
Trigger

Step trigger. The trigger allows to jump from the current step to the next step if a pressure or flow condition is met.
- Trigger type: flow or pressure.
- Enable/disable step trigger.
- Condition: above or below.
- Trigger value.
Stop at
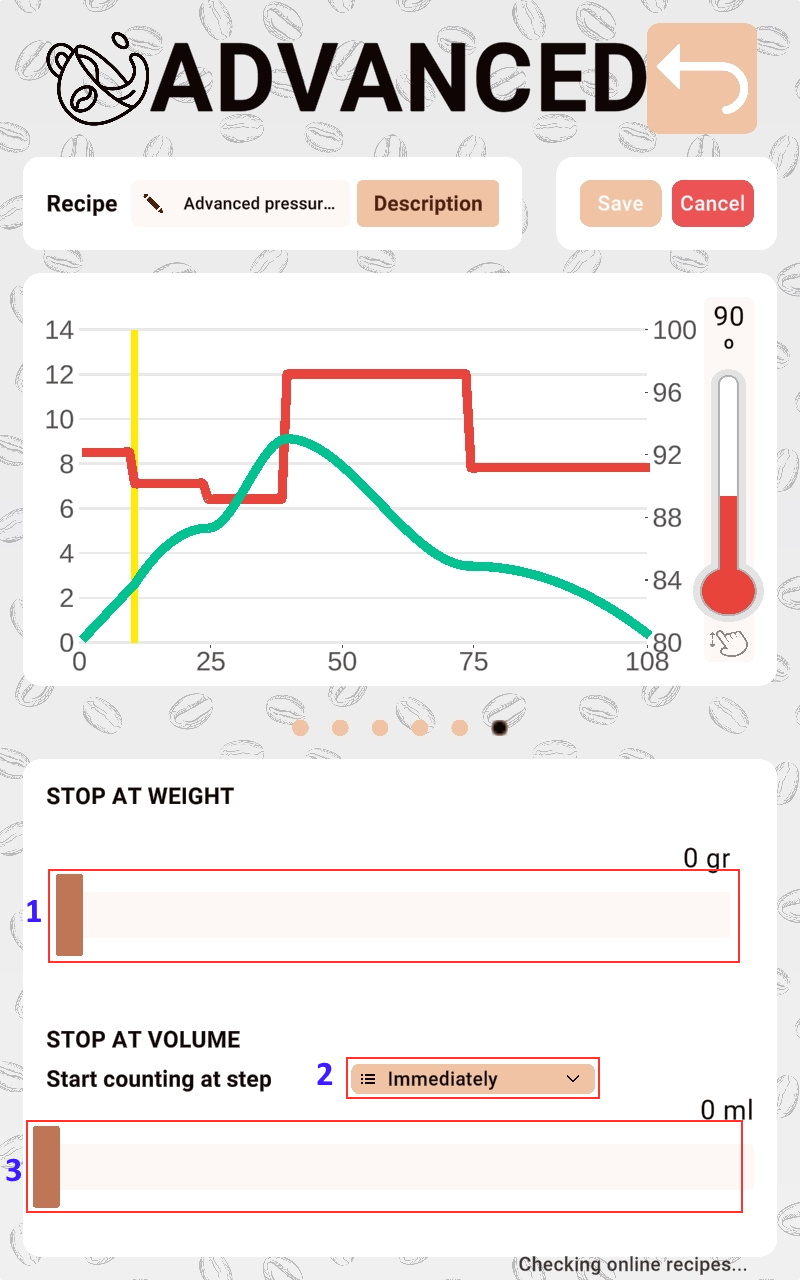
Stop at. Allows you to stop the infusion if a specific volume or weight is reached.
- Weight target.
- For the volume, the step at which the volume starts to be counted must be decided. For example, it does not make sense to define pre-infusion as a counting step because you would not reach an adequate weight in the cup, as the coffee puck would absorb the water.
- Volume target.
Changelog
See what's new added, changed, fixed, improved or updated in the latest versions.
Version 1.1 (8 March, 2023)
- Added APP download URLs
Version 1.0 (12 April, 2022)
Initial Release